
WINGED WARRIORS/NATIONAL B-BODY OWNERS ASSOCIATION
ASK THE EXPERT
by David Patik
The Winged Warriors/National B-body Owners Association's monthly publication includes the "Ask The Expert" feature wherein David Patik, our Restoration Advisor, answers club members' technical and restoration questions. David had spent his entire adult life researching and learning about Daytonas and Superbirds, and the performance B-bodies. Here, we will share this information with those of you who visit this website, through the questions and answers that have previously appeared in our newsletters. Hopefully this will be helpful in answering some of your own restoration questions. The Q & As are grouped into sections by specific car model and numbered in each section.
++++++++++++++ROADRUNNER, SUPERBIRD AND GTX+++++++++++++++++++
1. ______________________________________________________
QUESTION: I have a 1970 RoadRunner that was built on February 20, 1970. It has a jack in the trunk that is a steel rectangular tube and has a zinc dichromate plated finish on it. It is not the solid cast unit with grey paint that I have seen in other 1970 RoadRunners. Someone told me that it is possible that the tube version is original because Chrysler was in the process of switching jack styles that year and that it just depended on what the assembly line was stocked with on that day. Is this true?
ANSWER: Several possibilities exist to explain the different bumper jacks used by Chrysler. (1) Different vendors were used purposely so that in the event of a labor strike at one of them, the other vendors would be there as a supplier. (2) Since literally millions of bumper jacks were ordered by Chrysler, and there were many different ones, Chrysler alternated suppliers for each new design. (3) Some bumper jacks have a grey base and hook, some have black. Some jacks have a hollow tube, some have a solid tee post.. (4) Some car bodies had either of the above possibilities, but never both. Most b-bodies had any combination of #3 above. 1970 Belvederes and Coronets had any possibility.
2. ____________________________________________________
QUESTION: Did all Superbirds come with the beep-beep horn?
ANSWER: All Superbirds have the "standard" lavender beep-beep horn. There was no difference between it and the stock RoadRunner horn.
3._____________________________________________________
QUESTION: Our Superbird's fender ID tag was not painted body color. Is that correct? Is that determined by the assembly plant or what?
ANSWER: I never could see the rationale for fender tags not being painted. A fender tag is made before the car is framed in the assembly plant's Body Shop, and it is necessary also for the Paint Shop. I can't figure out why multiple Superbirds have no paint on their original fender tags. Other assembly plants and other cars also built in 1970 did have the fender tag attached to the inner fender during the dip and paint process.
4. _____________________________________________________
QUESTION: What is the correct finish for a driveshaft in a Superbird?
ANSWER: The driveshaft had no paint and no undercoating on it. The driveshaft tube should be bare steel, with lengthwise "lines" from the manufacturing process. Sand a blasted shaft to re-create the lines. The ends of the driveshaft are all bare. To preserve pieces like this from rust, use KAMAR VARNISH by Krylon. It never yellows. You must use several coats or it will not protect adequately from rust. Buy this product at art supply stores and some hardware stores. Other clear sprays do not do the job like KAMAR.
5. _____________________________________________________
QUESTION: I had you rebuild my dash and gauges and they are absolutely stunning. Everyone who remembers the old dash and gauges cannot believe how well they have been restored. You did a fantastic job. I do have one question for some direction. I ended up driving my '70 at night for the first time. There were no lights in the clock/tach. Is the bulb for this unit inside the tach or under the dash? I poked around today and could not really determine this. I don't want to take the dash bezel off unless I have to.
ANSWER: The clock/tach uses a #57 bulb and it is accessible from the rear of the gauge cluster; no need to take anything apart. It is the orange wire, I believe, and it will be a single bulb. Be sure you haven't mixed up wires from stuff like the high beam indicator and turn signals.
FOLLOW UP QUESTION: I got under there and looked and there is an orange wire going to what could be a bulb. I would say it is about 1:00 on the clock. But it is impossible for me to get my fingers up that far as it is too tight. Am I looking at this correctly? I would have to have a very small hand to reach it. I would sure like to get it lit up.
ANSWER: Here are the positions of the gauge cluster lighting that uses individual wires, using a clock face to orient them. This is for the clock/tach: 7 o'clock - 2 o'clock - 4 o'clock. Here are the positions of the cluster lighting that uses individual wires if you have a two-faced clock: 9 o'clock - 2 o'clock - 4 o'clock.
FOLLOW UP QUESTION: I think the restoration shop has the wires mixed up? When I hit the high beams I noticed: (1) The left side of the speedometer lit up; (2) The right side of the tic-toc-tac lit up at probably 2 and 4 o'clock; (3) The left side of the tic-toc-tac is dark--the 7 o'clock bulb; (4) There is no high beam indicator. Any chance you have a wiring diagram that I can sort this out? It is incredibly tight to work under the dash.
ANSWER: You won't need a wiring diagram. All you need is one wire with alligator clips on each end. If you are careful, you can't cause a short by what you are going to do and that is, test each single-wired bulb, one at a time. Pull each socket with its bulb from the instrument cluster housing. Use the alligator wire to provide a ground to the bulb, by jumping one end to the cluster housing and the other end to the socket. By turning switches on and off, you should be able to light each bulb. Put each socket and bulb into its correct hole in the cluster housing. I hope you don't have a reproduction wiring harness! If you bought one of the cheapo ones, God help you! Those are wretched junk. Return it for the "better" harness, which is mediocre, but at least it rarely causes fires.
6. ____________________________________________________
QUESTION: What is the stock diameter of my Superbird's front sway bar?
ANSWER: The short answer is: 0.88" =7/8" = part number 2835862. Here is a list of 1966-1973 B-Body front sway bar part numbers:
1966 through 1968 B-body with link-type sway bar = 0.94" = 15/16" = part book number 2462884; build sheet number 2462885
1969 = 0.94" = 15/16" = part number 2462885
1970-1972 B-body all, except 1972 Charger with 340 = 0.88" = 7/8" = part number 2835862
1972 Charger with 340 = 0.94" = part number 2948723
1973-1974 B-body, except 400 & 440 = part number 3402891
1973-1974 B-body with 400 & 440, and station wagon = part number 3722411
1970 E-body except 340+6 = 0.88" = part number 2835862
1970 E-body with 340+6 = 0.94" = part number 2948723
7. _____________________________________________________
ANSWER: Thanks to Jay Keller at CarQuest Auto Parts Automotive Refinish Supply in Tallahassee, Florida for the answer to your question: Original finishes of the seventies leave a lot to be desired. In their original application, they were not of the appearance you would expect to see on your completed restoration. The "Dodge Boys" called code V2 "Hemi Orange, while Plymouth used the moniker "Tor Red". Yes, it contains metallic, albeit a small amount, that may be a bit difficult to detect in an original untouched finish. The quality of the original paint (almost archaic by today's standards) and the practices associated with mass production usually resulted in a less-than-stellar paint finish. You can't blame anyone, really. It was, after all, 1971 and I think we all realize how far technology has advanced in the last 35 years.
8. ____________________________________________________
QUESTION: The AM radio in my Superbird went out and after pulling it out and doing some testing myself (I know enough "vintage" electronics to be dangerous), it seems nothing obvious is wrong with it. So I am considering my options. I may opt for a replacement stock radio, or an AM/FM stock radio, or repair of mine. I think I saw a place that will replace the old electronics with "modern" components? Where would I inquire about a replacement AM or AM/FM stock radio? Finally, do you know of any place to send the radio for repair of the original components?
ANSWER: Look in Hemmings Motor News any month of any year and you'll see several, if not many, people and places that restore antique car radios. Some of these places have been around fifty years! Several will convert AM radios to AM/FM, and it's all hidden inside your original-looking radio. This update can approach $600-$900. A 1970 AM B-body radio in working order is easy to find, and very cheap. Lots of them exist. Original 1970 B-body AM/FM radios would be expensive indeed! This is a one-year-only radio! Once you get a radio rebuilt electronically, we* can cosmetically restore it, polish the lens, replace the anti-rattle pad, paint the needles, repair wiring, clean and date-code and replace the stickers.
9. ____________________________________________________
QUESTION: Do you know of anyone who sells the insulation which glues to the underside of the roof above the headliner for my 1971 RoadRunner?
ANSWER: This stuff is also used in upholstered home furniture. It may still be available from your local upholstery shop. It used to come in several thicknesses and widths. I don't know if this off-white-cotton-exact material is made today. Perhaps your smallest, oldest shop would still have some from years ago. Additional information from Sue George: Use the 3M Super Trim Adhesive #08090 in a spray can to glue the insulation to the roof and the front corners and sides of the headliner in place.
10. _____________________________________________________
QUESTION: My Superbird is on the rotisserie being restored. When the bodyshop hand-stripped the original paint off the top of the hood, on the bare metal, below the first coat of primer, was written in what looked like a wide-tip, black felt pen, in large black letters "NASCAR". Unfortunately, they didn't tell me about this until after they shot the hood with a coat of primer so I was unable to get a photo of it. Have you heard of this before? My car has never been restored before.
ANSWER: Infrequently, I hear of "notations" on NASCAR street version cars' various parts. One of my 1969 Charger 500s had "1-17-69-2-1" written in white grease pencil on the underside of its hood. What was the meaning? This is just a guess about your hood's "NASCAR" lettering, maybe they were letting the parts handlers at the stamping plant know that the batch of newly-stamped and assembled hoods were part of the "NASCAR Program" at Chrysler. Maybe the"Superbird" name wasn't even official yet. Maybe the Superbird project was being kept a secret from production people. Maybe your hood was actually destined for a race team, but got sent to Lynch Road, and was put on a street car. These are all just guesses. (Additional note from Sue George: I have seen several Superbirds that had the word "NASCAR" hand-written in black on the roof underneath the original vinyl top. I have also seen this lettering stamped in black ink on the back side of the fabric on original vinyl tops. Many Superbird broadcast sheets, though not all, also have a "NASCAR #1 or NASCAR #2" notation at the bottom usually done in blue grease pencil.)
11. ______________________________________________________
QUESTION: When I purchased my Superbird it didn't have chrome exhaust tips on it. Although it was a one-owner mostly original car, the exhaust does appear to have been replaced at some point. Did all Superbirds come with chrome exhaust tips or was that an option that would appear on the fender tag? If so, what is the code for it?
ANSWER: Exhaust tips were not standard on Superbirds. In fact, they were illegal in California, because the exhaust pipes had to exit down at the back of the car, not out and back under the bumper. There is no code for them on the fender tag because the Metal Shop and the Paint Shop areas of the assembly plant didn't need to know if the car would get them or not. The broadcast sheet on all Superbirds will be coded N41, which means dual exhaust. If the car had exhaust tips, the broadcast sheet will be coded N42. This is true of all engines on all Superbirds. This is not necessarily true of all other cars, though.
12. _______________________________________________________
QUESTION: How were the original 1971 GTX side, bumper-to-bumper pin stripes applied?
ANSWER: They were originally lacquer sprayed on over baked enamel. The dealer replacement stripes were tape that was a single stripe 3/16" wide. It is to be spaced 1" over the body character line all along its length. Just buy a roll of stripe in any auto parts store and contour it as you apply it.
13. ________________________________________________________
QUESTION: Are the Superbird grille screen and grille frame supposed to be painted the body color or black? I've seen them both ways and am curious to find out which way is correct.
ANSWER: The order of assembly of the Superbird nose is as follows: (1) The exterior of the bare shell is primered in light grey. (2) The interior bare shell is painted in satin black over bare metal. (3) The grille frame and park light frames are primered in light grey on the front and back sides, off the car. (4) The headlamp doors are painted flat black while still in bare fiberglass. (5) All special nose internal parts are pre-painted satin black over bare metal. (6) The nose is completely assembled (no color coat yet). (7) The park lamp lenses are masked off. (8) The nose assembly is color-coated (off the car). Park lamp frames and grille frame screws are color coated. Overspray goes everywhere, except on the headlight doors because they are masked off. (9) These frames are never black. There are two different frame retaining screws. One type is a unique flat-headed phillips with course threads. The other is a chromed, rounded-head phillips. Either one will work in the original J-nuts that are used for the frames. Their size is #10. In any case, the mating areas of the frames and the nose shell are always light grey primer, and the screws are always color coated.
14. _________________________________________________________
QUESTION: What size and style of wheel and tire should my Superbird have for a spare?
ANSWER: If your car had 15" wheels, your spare was a 15". If your car had 14" wheels, your spare was a 14". There was no collapsible spare available on a Superbird, so we can also say that all five tires were exactly the same. However, if your car had Road Wheels (five spoke) or Rallye wheels, the spare was still just a black wheel. The spare was never a Road Wheel or Rallye wheel. If your Superbird had 15" Rallye wheels, the spare wheel would be a black 15" x 7". If your Superbird had any type of 14" wheels, the spare would be a 14" x 5.5" black wheel.
15. ____________________________________________________________
QUESTION: I am trying to restore the dog dish hubcaps on my 1970 RoadRunner. I am trying to find the best paint to use for the trim lines and the lettering. Do you have any suggestions and a good procedure?
ANSWER: Before you strip the painted areas, look very carefully at them. Is the black on them a gloss, satin or matte? If there is silver paint, is it textured, flat or satin? If there is red, what exactly is the shade of red? Paints vary widely in quality. Hardware store "home & farm" spray paints have poor durability compared to top-of-the-line automotive paints. And automotive spray can paint is usually very inferior to paint mixed up for you by our local auto body supply store. Custom matched and tinted paints from the auto body supply store can be very expensive. How much sunlight will your car be seeing? Red paints have poor durability. So the best durability paint is necessary for driven cars. You won't want to do this job more than once! Take pictures and measurements before stripping original paint off the wheel covers. If the paint is originally found on more than just a recessed area, you will have to know exactly how to mask off the wheel cover. Stripping the hub cap paint can be done with Klean-Strip Aircraft Paint Remover. Body supply stores sell it in quart cans. Bulldog Adhesion Promoter is a spray can primer that helps paint stick to surfaces like aluminum or stainless steel. On the wheel covers, use of a normal paint primer may not be a good idea, because it might be visible around the masking edges. The Bulldog Adhesion Promoter is clear. It's only problem is a tendency to spray on with lots of "orange peel". Test it first, and only spray light coats. Follow the can directions. Buy it at any auto body supply store. Masking tape is available in "clean edge" grades. It results in a much sharper edge, compared to the jagged edge if regular masking tape. Home supply stores and body supply stores sell the clean edge type. Use an x-acto knife with a short blade to cut the masking tape if the pattern is complicated. Knife #1 works best with #16 blades. Color coating will have to be done with spray. Brush painting will likely look awful on something like a wheel cover. If your covers have argent silver paint, you can buy the best, most correct paints from Mike Voth at Alltrim.com. He also has correct wheel paints, grille paints, and can do complete service on any parts involving plastic, texturing, welding, etc.
16. ________________________________________________________________
QUESTION: I have an opportunity to purchase a fuel tank for my 1970 Superbird. The part number given to me is #2880434 but it doesn't look quite right. Is this number the right fuel tank?
ANSWER: The fuel tank for 1970 R & W w/o ECS = #3404491; fuel tank for 1970 R & W w/ECS = #3404392; fuel tank for 1968-69 R & W is #2880434. I don't know if there are any practical differences between 1968-69 and 1970. ECS refers to the evaportative control system, which definitely does mean differences between cars with it and cars without it. R = Belvedere/RoadRunner/GTX/Superbird; W = Coronet. The Charger fuel tank is completely different. Try the Chrysler dealer first for a new fuel tank; some are still available new.
17. _________________________________________________________________
QUESTION: I have a black 1968 GTX with red stripes that reflect. I am looking for a stripe kit to put back on my car after I repaint it. It is not maroon red stripe like I bought from somebody else, but it is RED. Can you help me with a stripe kit and trunk panel stripes also?
ANSWER: I have never seen evidence of original on-the-car stripes for 1968 GTX that were red reflective. The original red for that car was "Tomato Red" which is the same as R-4 red. We can make you a set in reflective red. It's called "Ruby Red" and is a beautiful medium red material that is commonly associated with the 1969 RoadRunner and GTX side stripes. Reflective material is seven times more expensive for us to buy than non-reflective. So the price of the set of reflective red is more than the usual price for the stripes. The stripes for the 1968 GTX did come in maroon non-reflective. The taillight panel stripes were always reflective maroon, which matches the taillight lenses.
18. _________________________________________________________________
QUESTION: Can you tell me who out there sells the back gasket for my 1970 RoadRunner rear window?
ANSWER: 1970 B-body cars don't use a rubber gasket. Go to any quality body supply shop, and buy the ribbon type black sealant. Follow directions to make sure the window is completely and evenly set into the metal frame. You may need to replace the little metal and rubber supports that hold the window up, keeping it from sliding down over the years.
19. __________________________________________________________________
QUESTION: I have some questions regarding the fender tag on my Superbird. I believe I read somewhere that the tag was bent up during the painting process in the left corner and there should be paint on that screw head in that corner but not on the other. Is that true? If so, how far was it bent and what would be the best way to duplicate the factory look?
ANSWER: Some fender tags have no paint at all on them. These must have been hung from someplace like the windshield frame, on a wire, when the car went through the dip vats and paint booths. Read my "Lynch Road Assembly Plant Tour" for information about the Metal Shop and Paint Shop. Most cars built did have the fender tag attached to the left inner fender by the time the car left the Metal Shop. The front screw held it on. The tag was bent forward at perhaps a 45° angle. Apparently, this bending was done for the purpose of allowing paint to be sprayed under there. But, the bending could also have been an inspector's cue that the car body was indeed inspected. All cars were sent into the Dip Vats. They were totally submerged in some vats. In the Dip Vat, for the inner body primer, they were dipped up to the level of the headlights. So the fender tag may, or may not, have been coated. The color coat was applied by two people with paint guns. They would have painted the tag in its installed place, still one screw holding it on, still bent up. The car next went to the Color Baking Oven. After that, the tag would have been bent down, and a black oxide screw attaches the rear of the tag to the fender. So the front screw is body color, the rear screw is black. If your car had an original tag on the original underhood paint, and the tag had little or no body color on it, then that tag must have been hanging from the windshield. All Superbird side valance panels were hung from the windshield frame area to be color coated. So hanging things to be painted in the car were not unusual.
20. ______________________________________________________________
QUESTION: My son and I are restoring a 1969 RoadRunner. It is a numbers matching 383 4-speed car. All of the info and old literature that I've found states that for 1969, RoadRunners came standard with a 150 mph speedometer. This one and others I've seen all have a 120 mph speedometer. Was this a misprint or was the 150 mph speedometer an extra option that had to be ordered with a different dash configuration, maybe a Rallye dash?
ANSWER: The 1968 and 1969 RoadRunners came only with "standard" instrument panels. This means, among other things, that the speedometer is a rectangular unit. All 1968 and 1969 RoadRunner speedometers were 120 mph. All 1968 and 1969 GTX's came with standard instrument panels, but their speedos were always 150 mph. There was never, in these two years, an option to order a 150 mph speedometer on a RoadRunner. However, there was an early 1968 version of 120 mph and 150 mph speedometers. That is, the lengths of the white "hashmarks" on the background speedometer plate are almost all equal. This was hard to read, and a production change was soon made. Also, early 1968 GTX (and Coronet R/T) 150 speedometer lenses had "0" after each number, making for a very crowded lens. This, too, was soon changed. Some standard lenses from 1968 and 1969 had the switch names printed in white on the back side of the clear lens. Some did not. There was no Rallye option on 1968-79 RoadRunner or GTX.
21. ______________________________________________________________
QUESTION: Do you have sample photos of your restoration projects for 1968-70 standard B-body style GTX instrument panel? Will a restoration also include rebuilding functions that don't work on the panel as well?
ANSWER: Photos of instrument panels don't show much of any detail. We've tried taking pictures of the usual dirty and faded parts when they come in here, then take pictures of the finished parts. They appear on film to be about the same! B-body standard switch bezels are stripped, painted, lettered and baked. Switches are rebuilt, and chrome is polished or rechromed. Faces are stripped, painted, white lines painted, baked on. Lenses are polished, needles painted, gauges and the speedometer are calibrated. All parts are cleaned. The circuit board is acid dipped. Heater and A/C controls are restored, arm rest bezels are rechromed. If you have a B-body standard dash, you will have very significant differences between 1968 and 1969. Early instrument bezels are rechromed and blacked out, the odometer is relettered. This is just a basic outline, a lot more work is done. We have almost any part you may need to make everything look right, work correctly and be correct.
22. ______________________________________________________________
QUESTION: I purchased a new fuel tank sending unit for my 1969 RoadRunner from the Paddock about a year and a half ago and I can't get the damn thing to work! When I ground it to the frame it goes to full as it should. But when I ground it to the main fuel line, as it should be, I get nothing. It shows empty. All my stock wires check out okay. I read in the Winged Warriors newsletter recently that aftermarket fuel sending units never work correctly. Is that true, and if so, why would these suppliers sell something if they know it won't work?
ANSWER: Your new sending unit in your tank will NEVER work correctly if its one of the repros mentioned in my newsletter article. That's because the maker and the vendors know perfectly well that it won't, and their solution is to recalibrate the gauge. I believe their miserable trick in making the sending units is simply adapting one made for who-knows-what-car, and making it "physically" fit into Chrysler fuel tanks. You need to find a good used unit. You know your gauge, ground, voltage limiter and wiring is all okay because grounding the sending unit wire makes the gauge read full.
23. ______________________________________________________________
QUESTION: I have a Hemi Superbird. What is the correct bumper jack for this car?
ANSWER: The Superbird can have either the hollow tube post or solid tee post jack for 1970 Belvedere. The correct jack hook is #2931103.
24. ______________________________________________________________
QUESTION: You restored my Rallye instrument cluster for my 1970 RoadRunner. Over the weekend I finally started the engine after the rebuild and the gauges all worked, but I'm not sure they are reading correctly. After the rebuild, the engine was pre-oiled and held 69 lbs of oil pressure. With the engine running, the instrument gauge reads 40 lbs. There is a 190° thermostat in the engine, but the gauge reads 170 when it is up to operating temp. Also, I put 10 gallons of gas in the tank which is an 18 gallon tank, and the gauge reads 1/4 full. The sending unit is new. Is there something else I can check or some adjustment I can make? I am going to install aftermarket oil and temperature gauges, but the gas gauge I really need to be accurate.
ANSWER: Where did you get the fuel sending unit? Is it a repro or NOS? If it is a repro, you are in for a wicked surprise! It won't work right ever! The manufacturer says to recalibrate the fuel gauge. Absurd! I would guess that you may have a possible bad ground to the instrument panel. Did you take the dash frame out and repaint it? There may also be a bad ground between the instrument panel and dash frame. Test these grounds and let me know. Don't forget just ground each sending unit wire one at a time and turn the key to run. It should read "full on". Never, ever pump voltage backwards into a sending unit.
FOLLOW UP QUESTION: Yes, it's a repro fuel sending unit. Where (how many places) does the instrument cluster ground? The frame was removed and painted so obviously that's something I'll have to check closely there. I will ground the sending unit wires and keep track of their readings.
ANSWER: All you need is one sure ground to the instrument panel frame, and one good ground to the instrument cluster itself. The metal of each is itself a continuation of the ground. The sending unit for fuel-temp-oil are eliminated as variables by simply grounding them (one at a time, never all at once). The sending units for each gauge simply act as "metering valves" for how much ground the gauge is given. The gauges all get 5 volts positive, which is "portioned out" by the voltage limiter on the back of the instrument cluster. It just "steps down" its 12 volt supply into 5 volts.
25. _______________________________________________________________
QUESTION: Should the painted blackout on the Superbird headlight openings be flat or semi satin? On a Petty Blue car, should the quarter panel decals be black or white? What about if the car was EV2 Tor Red?
ANSWER: The paint on the nose was originally Black Organasol, which was a textured black semi satin. It matched the textured black nose and headlight decals which were DiNoc. DiNoc textured has not been available for thirty years now. Our* black nose decals are Scotchcal matte black. A perfect match is Dutch Boy Fresh Look #3727 flat black. Any other paint will be an inferior match. If you are not using our black decals, ask the manufacturer for their paint specs. Petty Blue cars use white decals, as do Tor Red cars.
26._________________________________________________________________
QUESTION: I read a lot of erroneous stuff written on the 1969 1/2 Sixpack RoadRunners. Can you elaborate on what's correct?
ANSWER: Thanks to Frank Badalson for this correct information: Most magazine articles written on 1969 1/2s are full of wrong info. I get a lot of calls on this subject and as you know I have done a lot of research spanning 26 years on ORIGINAL cars (not restored cars) and I've produced a detail video on the 1969 1/2 cars. Here is an overview: All were equipped with a special axle, code D69 (build code 999), automatic or 4-speed got the same axle and yes, it was a 4.10. All were equipped with code U7S G70-15 3/8 red stripe tires, Goodyear Polyglas ONLY. All fender tags were coded E63 (383 4bbl). All fender tags were coded A12. All cars were produced with standard F23, Group 24 battery, 59 amp with yellow caps (code F25, group 27 with red caps was an extra cost option). All were equipped with manual drum brakes. The only option was power drum brakes. All were equipped standard with 3-speed wipers. All were equipped with 5/16" fuel lines and 1/4" vapor return line. E87 A34 were never found anywhere on any paperwork or fender tag regarding the 1969 1/2 cars. Those codes were NOT used at all.
27. _________________________________________________________________
QUESTION: I have a 1968 GTX with the 150 mph speedometer. It is a non-Rallye dash. The speedo is fine but the plastic lens is broken and has a hole in it. Can this be repaired?
ANSWER: Plastic lenses with holes in them are impossible to repair. There were four different 150 mph lenses used in 1968. the early model 1968 cars used a lens with zeros after each mph number. Some of these lenses had the switch names embossed into the rear of the clear lens. These early lenses are rare and expensive. Later 1968 cars, and all of the 1969 cars with standard clusters, use lenses with no zeros after the mph numbers. Some of these lenses had switch names and some don't.
28. __________________________________________________________________
QUESTION: I believe my purple sixpack RoadRunner is a radio delete car. Would a radio delete car have the hole plugged in the fender for the antenna or no hole? My car still has the original paint on it, but there is a factory punched hole in the fender that is shaped like an antenna hole.
ANSWER: No hole, ever was put in the fender of a radio delete car. That's why the fender tag does code a radio if the car is ordered with one. That way the Metal Shop knows to drill the holes. Every fender stamping has no antenna hole. This is true for the assembly line or the dealer. I've never seen a parts book mention the availability of any new fender for "with antenna hole".
29._________________________________________________________
QUESTION: Why are the headlights opening up on my Superbird after the engine is turned off and how can this problem be fixed?
ANSWER: The problem requires a lot of explanation. Here are the basic possibilities: (1) The vacuum headlight switch is filled with crud which prevents the rubber valve in it from sealing with the switch housing. (2) The rubber valve in the switch has hardened with age, resulting in poor sealing. (3) Lots of crud over many years has resulted in deep grooves being ground into the switch housing, because the crud is between the valve and the housing. (4) Any or all of the hoses in the system are cracked, and/or their ends are loose on the nipples to which they attach. (5) The vacuum motors inside the nose headlight canisters are leaking. The valves in these motors are also rubber, but it's hard to take the motors apart. If you buy used or NOS motors, their part number must end in "961". (6) The vacuum reservoir tank under the battery is leaking, or is rusted. Replacement tanks are now available. (7) The fitting on the vacuum tank is broken, or hoses are loose to it. (8) Any or all of the vacuum hose tee fittings or straight line fittings are broken, or cracked, or the hoses are fitted loosely on them. (9) Not a solution but an explanation: The springs that hold the headlight doors open (all of these cars originally had these springs) exert heavy tension. The slightest leak, especially after 35 years will cause the doors to open if the engine is not running. If the engine is running, the doors should be firmly closed.
30.________________________________________________________
QUESTION: I am restoring a 1970 RoadRunner and am trying to determine if my car came from the factory with both a left and right drain plug in the trunk extension panels? The right side original has a plug on a raised boss but unfortunately the left original is rusted too far to tell. I am having to replace both sides. The replacement panels have a raised boss on the right side but there is no boss on the left panel. Did both sides of these extensions originally have the raised bosses? I was surprised how crude these were because they are from a well-known vendor.
ANSWER: All B-body cars from the 1968-70 time period had grey or black drain plugs on the left and right quarter outside lower extensions. They each had a small, rounded area at the bottom, to allow water to escape. The sheet metal on these quarter extensions always had the holes for the plugs whether it was on-the-car originals or dealer replacement sheet metal. Crude reproductions may not have these holes, or even the boss where they should be punched out. You will find that - at best - 20% of the stuff sold by places like the vendor you bought from, is correct.
FOLLOW UP QUESTION: Mounted in my trunk pan on the left side toward the rear were three flat-headed 5/16" x 3/4" long bolts that are threaded into the pan. They are in a triangular pattern with one on the extension and the other two on the center pan with the threads pointing downward. The pan is punched in order to form threads for the bolts. They are the same type bolts used to fasten the upper transverse panel (in front of the radiator) to the fenders. Because these same bolts were used on the panel above, which I know is an original panel, I figured the ones in the trunk area are too. I cannot find anything in the manuals about them, nor can I find anything that would attach to these holes in the trunk pan. The ones in the trunk also had 1/8" thick rubber discs adhered to the heads. Their physical condition suggests that they may be original.
ANSWER: I don't have a RoadRunner here to look at but here are some ideas as to what those bolts may have been used for, just from memory: (1) Gas tank filler pipe neck gasket; (2) Exhaust pipe hanger/extension bracket; (3) Gas tank support strap holders; (4) Rear spring attachments; (5) Because you said "left side only", I'm inclined to guess they are for the exhaust hanger. That's because I'll bet the right side hanger support is welded on, because every car had a right side exhaust pipe. But only some cars had the left side exhaust pipe.
FOLLOW UP QUESTION: Thanks for the possible ideas. Unfortunately, I know where all of the mentioned items are mounted, and that isn't where these bolts are. They are just to the left of the frame rail on the pan, not the frame. The left exhaust for the duals, as well as the standard right exhaust have rear mounts under or to the side of the frame rail. One last thing we found was a ring wire terminal (presumably a ground) hooked to one of these bolts. Since my car was mostly disassembled when I bought it, there was no wire hooked to it. I cannot find where there was a separate ground wire for the rear wiring harness on any wiring charts. The car did have a trailer hook-up added at some point, but I can't imagine what bracket you would attach to a pan given the pan's strength. However, that may be where the ground wire came from?
ANSWER: I talked to Scott at MCU Body in Michigan. He immediately said that the three holes in your pan, in the shape of a triangle, were from a Holley electric fuel pump. Big block engine original fuel pumps were notorious for the camshaft lobe wearing out that rubbed on the pump push rod. Rather than replacing the camshaft, and all the other work required, guys just put an electric fuel pump on, by the gas tank. And, Scott says the Holley pump used a grounding wire just like you described.
31.__________________________________________________________
QUESTION: I have a 1969 RoadRunner and I am changing the interior color from green to black. Is it possible to restore and re-dye the interior door and rear seat panels from green to black? The panels I have are in reasonable shape, the fiberboard is good. There are a few small tears in the vinyl but the vinyl is still supple. If they cannot be re-dyed, what will it take to replace the vinyl with correct black material for this car?
ANSWER: Can you dye green panels black? Yes. Should you? Never. For two reasons: (1) Brand new door and quarter panel interior black vinyl is available everywhere and not too expensive. Used good pieces go for way less than new, of course. These are common parts. (2) There is a huge lack of durability when you spray dye soft upholstery parts. There are several vinyl and plastic dyes available from quality auto body shops. The junk from cans from places like the franchise auto parts stores is worse than worthless. Even the quality soft vinyl dyes will become gummy, fade and they will rub off eventually.
32. _______________________________________________________
QUESTION: Are the stop plates on my Superbird's headlights straight on the bottom where they meet the 1/4" x 20 stop bolt?
ANSWER: The stop plates have slightly rounded corners, and the bottom of the plate is slightly bent toward the front. They are not flat.
33. ______________________________________________________
QUESTION: Is the inside rear window trim available for a Superbird?
ANSWER: The inside rear trim is one-piece flexible plastic with a "cap" to hide where the ends meet. I have never heard that this is a special part. Just find a good used black flexible strip from a Coronet, etc. or they are available new from Trim Parts.
34. ______________________________________________________
QUESTION: Is the long coil (#2495531) correct for a Superbird? What is the correct voltage regulator for this car?
ANSWER: For all cars, 95% originally had the long coils. Long and short coils seem to be indiscriminate. The original voltage regulator had two mounting holes and a dime-sized impression on the right side. You can find NOS regulators quite easily. We can re-letter and date one for you. You can buy a new one from Chrysler now but it does not have the impression.
35. _____________________________________________________
QUESTION: I have a 1969 RoadRunner with the build date of 10/12/68. This car has bench seats. I am aware that the seats should not have headrests, at least that's what I've been told. Mine does not.
ANSWER: All cars assembled 01/01/69 and later have headrests, by law. Cars made before that had headrests as an extra cost option. Your broadcast sheet will show this.
36.___________________________________________________
QUESTION: I have a Superbird that was originally a 440 car that has been converted to a Hemi car. The broadcast sheet indicates that this car was a special order car. It has chrome trim on the rear side marker lights and around the taillight recess like a GTX would have. The oddest thing is that it has an R/T hood on it. Not a mock-up but an actual cut-down and formed R/T hood that looks like it was factory installed. Two restorers and three body shops have looked at the hood and agree that the work quality is way beyond what a local type body shop could do. Do you have any ideas?
ANSWER: Thanks to Roger Wilson for this answer: Concerning the chrome trim on the back of a GTX, there is no code on the broadcast sheet for that. It was standard equipment on ONLY the GTX and Sports Satellite, so it was not available as an option on any other car. The Satellite had the four-piece set of trim around the taillights but not the outer three-piece set. Maybe you need to look at the radiator support and trunk lip under the weather stripping and see if the VIN numbers there match your dash VIN. Maybe you have a Superbird that was re-bodied with a Satellite or a Satellite that was made into a Superbird clone.
ADDITIONAL INPUT: Thanks to Sue George for this information: ALL Superbirds were coded as special order cars on their broadcast sheets. This does not make your car any different than any other Superbird. As for the R/T hood, it is not a factory installed hood, even if the body shop guys say it looks good enough to be one. Superbird hoods are unique only to a Superbird and no other option was available. The Superbird hood was a 1970 Coronet hood with the front section cut off and a unique Superbird extension added. The Coronet hood was used because of the contours already existing in the front corners that perfectly matched the contours of the Superbird fenders and nosecone. I have seen several people "personalize" their Superbirds with different hoods and this is obviously the case with your car, especially considering it has already had a major engine change.
37. _________________________________________________
QUESTION: I have a 1970 GTX with a 440 4bbl. The broadcast sheet shows an 084 axle code and 6700 transmission code. What does this mean?
ANSWER: Thanks to Roger Wilson for this answer: The 084 axle code is for a 1970 B-Body 4:10 Suregrip Dana 60 with 10" brakes so your car also had power front disc brakes. A 440 4bbl car with the Dana option is fairly rare. Did you mean to type 670 instead of 6700 for the transmission code on the Lynch Road tag? 670 is the correct code for the automatic transmission.
38. __________________________________________________
QUESTION: My Superbird is in the shop now ready to get a new windshield and rear glass installed and a new vinyl top. Someone told me that in the bottom of the rear window ledge, there should be two little shims that kept the glass from sliding down too low. Since my car did not have glass in it when I got it, these are gone. What are they and should I have them put in?
ANSWER: I believe from memory, that there are shims on the bottom of a Superbird glass rear window. In fact, I think every car has them, so that with time and heat, the glass doesn't slide down in the opening. Only rubber sealant holds the rear glass in. There is no rubber gasket like in the windshield.
ADDITIONAL INPUT: Thanks to Roger Gibson for this additional information: They do have rubber locating blocks on them. Their purpose is to locate the glass in the center of the opening so as not to interfere with the clips. They are not essential as long as the glass is placed in the center of the opening. I've never seen a glass move if the sealing ribbon is installed correctly. By that, I mean the surface is cleaned and free of rust and the pinch welt primer is brushed on. Then sealing urethane is applied. If the glass is too close to the clips when the molding is installed or you attempt to remove it, the clip will hit the edge of the glass when forced open. This can result in breaking of the glass and believe me, it is an expensive glass! I should caution you also about the reproduction clips. The upper lip is too big and the screw that is provided has too big of a head. When the molding is pushed in, the screw forces the molding toward the glass. It is virtually impossible to remove as the screw head puts a load on the molding. If it is close to the glass, it will make contact.
39. ______________________________________________________
QUESTION: I have a 1968 Plymouth GTX. The vehicle starts without any problems. However, in the summertime when the engine has been running and it is hot, the starter drags when you try to re-start it. I think the starter is getting overheated. Did the 440 GTX come with a heat shield surrounding the starter? What should I do about this?
ANSWER: Thanks to Sue George for this answer: The driver's side exhaust manifold did originally have a heat shield attached to it and it did help this problem somewhat. There is a better fix for this if you drive the car a lot. Simply install an electric fuel pump. In the summer when you are driving your old Mopar with the poor fuel that is now available, you likely experience fuel boiling in the carburetor. There is a lot of heat build-up in the engine compartment, combined with the outside temperature. The intake manifold becomes super heated and this heat is transferred to the carb(s). The original paper thin carb base gasket offers almost no heat insulation and has no heat dissipation properties. Therefore, you have two problems: a starter that has absorbed heat from exhaust manifolds/headers and is now sluggish and a carb that is dry because the fuel has boiled and evaporated away. With the electric pump, instead of having to crank on the already dragging, overheated starter to refill the carb float bowl, you can simply turn the key to "on" and let the pump push the fuel up to the float bowl for a few moments. Then turn the key to "run" and turn the starter over to start the car. Using the electric fuel pump almost never fails to start a hot engine with a very short use of the starter.
40. _________________________________________________
QUESTION: The three parts of the wood grain dash panels from my 1969 GTX are not the same shades. On the panel with the GTX logo, there are two (not real obvious) one-inch-long hairline cracks. The cracks are in separate locations but parallel and positioned right above the top chrome pin line. I'm wondering if someone has replaced these with some from another year of car?
ANSWER: The way to tell 1968 GTX/Satellite/Coronet R/T dash wood from 1969 pieces is by the radio bezel. If it's a 1968 and you have an AM radio, there will be no knob lettering on the wood. The 1969 has lettering. You will then see how 1968 wood is of a different color than the 1969 wood (all three pieces).
41. ________________________________________________
QUESTION: Would a 440 3x2bbl Superbird intake manifold be aluminum or would it originally be steel?
ANSWER: Thanks to Galen Govier for this answer: The intake could be aluminum or steel. All manifolds made after 01/01/70 were steel, but all Superbirds were built before that date. There is no way to know which one a Superbird had once the known original manifold is gone.
42. _________________________________________________
QUESTION: I am in the process of adding a few missing pieces to my 440 4bbl Superbird. I need to purchase the stamped pie pan for the air cleaner, but I have been told there are two different colors for the 1970 vehicles, red and orange. Which color is correct for the Superbird? Also, what was the Carter carburetor number for the original AVS that came on the 4-speed car? My carb is stamped 4617, which I believe is the original carb, though some printed source books state that it is a 1969 carb for the 440 4bbl manual transmission vehicles.
ANSWER: Since a Superbird is a Plymouth, and Plymouths were supposed to get orange air cleaner pie tins, it would originally have been orange. Get the pie tin from your Chrysler dealer. They still have them available. The correct carburetor for any car is according to the model year, not the calendar year. Therefore, a Superbird will use a 1970 Carter AVS #4737S for the 440 4bbl with manual transmission. This is for a car without the evaporative emissions control package. If it does have that N95 code, then the carb would be #4739S.
43. _________________________________________________
QUESTION: I own a Superbird clone with a 440 sixpack in it. I've built a new engine for it. I need to know the formula for the orange on the engine. I am going to use PPG paint on it.
ANSWER: Engine orange paint is available from Frank Badalson, call him at (804) 743-0570. All paint sold by restoration vendors and auto parts stores is incorrect.
44. ___________________________________________________
QUESTION: Do Superbirds have the provisions for the Gull Wing spoiler on the underside of the decklid?
ANSWER: Superbird #170172 does have a deck lid with provisions for the Gull Wing spoiler. This car is all original. The car is relatively close to the beginning of the Superbird production run, and it is logical that all cars after it also had the Gull Wing provisions. Cars before it are not hereby verified. If you need the location of the holes for the "RoadRunner" metal lettering on the deck lid, we* have drawings of those.
45. _________________________________________________
QUESTION: When you open the trunk of my Superbird and look to either side, the area that is round where the wheel wells are located on each side, it looks like there is a light cover of undercoating as you can see under the thin layer of paint that it is rough looking. My car has been painted at least twice and the last time it was a slobber gun person who did it. I am trying to find out what it should look like when we repaint the car because we're getting ready to strip the old paint off. Should we repaint it the way it is now, or make it look shiny like the rest of the car?
ANSWER: (1) The car was dipped in dark grey primer up to the level of the taillights. This primer was rinsed off the outer body. The primer had lots of runs and gobs on the inner body parts.
(2) In the trunk floor area from midpoint of the differential hump to the back end of the car, a white "plastic" sealer was applied in wide bands to the joints.
(3) In the passenger compartment area, from the midpoint of the differential hump and forward, but only as far forward as under the seat, a black "tar" sealer was applied in quite thick bands.
(4) Forward of the rear seat all the way to the firewall, the white plastic sealer is used. Here too it is applied in wide bands.
(5) The joint sealers, especially the white plastic, appear to have been somewhat broadened by perhaps the end of the applicator gun. They are not just narrow beads.
(6) Quarter panel sheet metal has unique sound deadener that was applied at the Stamping Plant, before any painting. It was not applied near the edges of the panel, and makes square jogs around the marker light holes. There was no undercoating at all applied inside the trunk.
(7) All visible areas in the trunk are "decently" painted body color.
(8) The inner wheel well humps are body color to the inside of the trunk and barely painted at all on the outer sides. The dark grey primer did not cover all of the outer sides of the wheel well humps.
(9) The interior of the car was also "decently" painted body color, although this is more likely the result of good coverage in door jambs and around window openings.
(10) The black tar sealer and the white plastic sealer should have body color over them.
(11) Roger Gibson uses 3M #08361 sealer for duplication of the white plastic seam sealer on the floors. It comes in a bag, needs a special gun to apply and is a very light grey in color. It can be painted the next day even if it is applied thick.
(12) Do NOT use 3M "Fast 'N-Firm" for any automotive use where the thick sealer is needed. This sealer will crack.
(13) Roger uses a different color product for the end of the cowl seam on B-bodies and on the front corners of E-bodies. It is "Magnum Steel" made by Versa Chem Company. It is a two part stick that you mix together to form a ball the size needed. It dries hard in a few minutes.
46. _________________________________________________
QUESTION: What hood hinges and springs are identical to those on my Superbird?
ANSWER: Here is a list, compiled from the 1966-71 Chrysler Parts Books of Belvedere/Coronet hood hinges and springs. R = Belvedere/Satellite/RoadRunner/GTX; W = Coronet/SuperBee (Charger is always identical except for 1971)
1966 RW Hinge #2583560 = right; #2583561 = left
Spring (need 2) #2583558
1967 RW Hinge #2583560 = right; #2583561 = left
Spring (need 2) #2583558; Hinge assist (2) #2802991
1968 RW Hinge #2945108 = right; #2945019 = left
R Spring (need 2) #2999448
W Spring (need 2) #2583558; Hinge assist (2) #2862050
W Retainer #6026548
1969 RW Hinge #2945018 = right; #2945019 = left
RW Spring (2) #2999448 (21-3/4 coils, yellow paint mark)
W & Plymouth C-body Spring (2) #2862050 (25-1/4 coils, red paint mark)
1970 RW Hinge #3454154 = right; #3454155 = left
R with air grabber Spring (2) #2909448 (21-3/4 coils, yellow paint mark)
RW Spring (2) #2862050 (24-1/4 coils, red paint mark)
1971 RW Hinge #3548908 = right; #35480909 = left
R 2-door hardtop Spring (2) 3586088
WM/WS Spring (2) #3586094 (SuperBee/Charger R/T)
WH/WP hardtop Spring (2) #3586092
Therefore, Superbird hood hinges are part #3454154-5, unique to 1970 Belvedere/Coronet/Charger. Superbird hood hinge springs are (2) 2862050, found originally on 1970 Belvedere without air grabber/Coronet/Charger. However, 1968 W, listed above, shows "hinge assist #2862050". What is that? Has anyone ever seen a 1968 Coronet or Charger with two double hood hinge springs? Not likely! What is likely, though, is that this is a Chrysler Parts Book error.
47. ______________________________________________________
QUESTION: Is my 1969 RoadRunner's front hanger for the rear leaf springs supposed to be black or bare metal in color? Or is it one of those things that could have been either way? Also, I have the same question about the plate that holds the U-bolts to the rear axle and the rear shock absorber mounts to. By the way, I have the rear springs themselves painted to simulate bare metal if that makes any difference on the finish of the front hanger or U-bolt mounting plate.
ANSWER: No evidence has been found, to date, that any of the parts in question were anything other than bare metal when installed. They were not grease-coated, or anodized, or painted, or anything! Just bare. You will want to prevent rust and corrosion on them, of course, so use a good bare metal looking paint. The stuff from Eastwood does NOT hold up well.
48. ________________________________________________________
QUESTION: I have a question concerning a couple of 1970 GTX broadcast sheets. At the bottom of the broadcast sheet, there are two numbers, 22 and 23, located in the boxes at the bottom right corner where it says "reserved for codes that cannot be broadcast above". I have a few GTXs with these codes and all were early built cars. I haven't seen any RoadRunners yet with this code.
ANSWER: Thanks to Galen Govier for this answer: On the early 1970 broadcast sheets, the 22 and 23 under the "reserved for codes" not seen elsewhere, I believe them to be car height or some codes related to the front brakes. The reason I say this is because box 1 is empty until A06 - October 06, 1969. And the earlier cars were found with the 22 and 23, but that ended before A06. It's just a guess since I have nothing to back it up.
49._________________________________________________________
QUESTION: The rubber block on the back of my Superbird's headlight switch is decomposing with age and leaks. Can I find this off of any other car or get a new one somewhere?
ANSWER: The rubber block was used for the vacuum headlight application (Daytona, Superbird and Charger) only. No other cars used it. No one makes it that I've ever heard of. You will have to buy a used one form the parts guys in the part of the country that the climate wouldn't harden them. Usually the hot climate cars have really hardened blocks.
50. _______________________________________________________
QUESTION: We are very close to finishing a Superbird in our shop and a question has come up as to the use of the plastic splash shields on the front frame between the K-member bolts and the rear one of the driver's side behind the wheel. Can you tell me if these were used on a Superbird? The front one attaches with two screws and the rear one with four. I have looked at the the parts book page with the Coronet fender as the Bird fender page does not show these shields.
ANSWER: All B-body cars were equipped with a plastic splash shield on each front frame rail. Two large-headed pop rivets, not screws, held each to the frame rail. A metal-and-rubber starter splash shield was bolted to the left frame rail. Unique bolts with built-in washers and pointed threads were used to attach this shield. The rubber portion is stapled onto the metal portion, with the tie rod passing through the cut-out in the rubber. If you are thinking, "Gee, I don't see any of this on the magazine cars or the top show cars", you are right! Hardly anyone who restores these cars thinks of these shields.
51. _________________________________________________________
QUESTION: What are the date codes on parts found on a typical Superbird?
ANSWER: Here are the date codes from Superbird parts I have restored over the years. They show some parts for Superbirds were made in mid-December 1969, although most parts I work with for these cars were made in October and November of 1969.
Correct voltage regulator = 489 = November 24-30, 1969
Voltage limiter = November 1969
Speedometer = November 3-9, 1969
Headlight switch = October 6,1969
3-speed wiper switch = December 15, 1969
Dome light switch = October 26, 1969
52. ____________________________________________________________
QUESTION: I am restoring a 1967 Hemi GTX. When I got the car there was no headliner and I am hoping that someone can help me with the color of the headliner. The car is TT1 Copper metallic, as are the door panels, etc. The dash and carpet are brown.
ANSWER: Thanks to Sue George for this answer: The headliner would have originally been tan.
53. _____________________________________________________________
QUESTION: My Superbird has a front bench seat and the seat buns need to be replaced along with the stuffing. 'The original 30-year-old stuffing has turned red and is falling out as dust particles all over the carpeting. My problem is in locating bench seat buns. No one seems to have them or make them, even though seat buns for the bucket seats are very commonplace. I thought about replacing the bench seat with bucket seats but the existing holes for the bench seat would not match the holes needed for the bucket seats. Are bench seat buns available somewhere or even from another car that would fit my Superbird seat?
ANSWER: Here's the information from Legendary Auto Interiors about the 1970 Plymouth bench seat foam and cotton stuffing: The foam on the seat bottom is 2" x 24" x 66" and is available for the front seat. The front seat top cotton stuffing is available in 10-12 pound rolls and priced per pound. You will need about two rolls to do the front bench seat.
54. ______________________________________________________________
QUESTION: I just bought my first Superbird and I want to get it decoded. The biggest question is what was the original color? It is currently Petty Blue and I want to put it back stock. Here is what my fender tag looks like:
5513 171682
114 083 676
26
V19 V88
EW1 H2X9 TX9 B30 J98XXX
E86 D21 RM23 U0A XXXXXX
ANSWER: Thanks to Sue George for this answer: Your Superbird was originally Alpine White. The fender tag is read from the bottom to the top, left to right so it is decoded as follows:
E86 = 440 4bbl 375 hp
D21 = A833 4-speed manual transmission
RM = Belvedere/Satellite, Medium price class
23 = 2-door hardtop
U = 440 4bbl
0 = 1970
A = Lynch Road, MI assembly plant
EW1 = Alpine White
H2X9 = (H) high quality grade trim, (2) vinyl bench seat, (X9) Black
TX9 = Black upper door frame
B30 = November 30, 1969 (all Superbirds have this scheduled production date. It is NOT the date your car was actually built.)
J9XXXX = Vehicle order number. All Superbirds begin with J97xxx or J98XXX
V19 = Special order vinyl top for Superbird
V88 = Delete all normal stripes and nameplate--for Charger 500, Daytona and Superbird. On the Superbird, V88 also meant no holes drilled for the quarter scoop "RoadRunner" lettering nameplates and no quarter birds.
26 = 26" maximum cooling radiator
114 = 440 4bbl
083 = 3.54:1 Sure Grip 9-3/4 Dana axle
676 = A833 4-speed transmission
5513 and 171682 = These were numbers used by the assembly plant and the meaning is unknown to us.
++++++++++++CHARGER, DAYTONA, CORONET, AND SUPERBEE++++++++++++
1.___________________________________________________________
QUESTION: Why doesn't a Daytona have a hood spring on the latch tray like a Superbird. It would make opening the hood much easier.
ANSWER: There are a couple of possibilities. Likely, they didn't have time to design it into the latch tray. They probably didn't think they had to because it wasn't required by law. Also, there were not enough cars built to make it worthwhile.
2. _________________________________________________________
QUESTION: In regards to the deck lid on my Daytona, should there be dimples on the outer face of the metal where it was probably welded from underneath? They are all the way across and are about an inch or so from that front edge. Also, in the area in front of the deck lid and below the back window, should that area be smooth or does the Creative Industries' bodywork show up there? One more thing, on the lower pan of the nosecone, should it have any paint or primer on the inside of it?
ANSWER: The front of the deck lid top sheet metal is spot welded to the underside sheet metal. Some deck lids have this more apparent than others, but it's always the same method. You can see the spot welds even when the original paint and stripe is finished. So, do NOT fill and sand and make it beautiful! They were not "finished" originally. The fastback sheet metal on Charger 500 and Daytona is all finished smooth on whatever area you see when the deck lid is closed. Creative Industries used pink plastic filler on the fastback joints. I went to the warehouse and looked at the Charger fastback deck lids. Some are original paint, some are NOS, some are Charger 500s and one was from a race car. Some have more frontal indentations than others. None had as much as the picture you sent. The trick they used to avoid that much indentation was to press very, very hard on the underside of the deck lid with the welding tool. The underside indents were pushed so hard that the underside of the lid is pushed toward the top side. So, there must have been a topside spot welder anode but it sure didn't cause much distortion, which of course, was the goal: as little distortion as possible. It appears that the underside anode was quite small and very sharp. If by the "lower pan of the nose", you mean front valance, it was painted the light grey primer on its outside surface before assembly to the front end and sometimes its inside was not even primed. The inside of the valance is never body color. If by "lower pan of the nose" you mean inside of the nose shell, the nosecone shell was welded together in bare metal, then the lead work was done. Then the outside was sprayed in light grey primer, or the inside was first sprayed with black paint over the bare metal. (Some noses were done in each order of painting.) Anyway, the nose was in light grey primer when all the pre-painted guts were installed. With a Daytona, all of the car was a converted Daytona when it was color painted at Creative. Only the wing was off the car.
3. _________________________________________________________________
QUESTION: I have two questions about Daytona front wheel lip moldings. When I purchased my car, the front moldings had been removed by a previous owner. I will obviously need to put something back in their place eventually. While looking at another Daytona in the process of being restored, I took a close look at its front moldings with an eye towards what it will take me to fix my parts-procurement problem. Correct me if I'm wrong but it appears that the Daytonas used a modified molding. By modified, I mean that it appears a metal stretcher was used to lengthen the "back leg" of the molding, thereby straightening out the bend where the valance extension intersects with the Daytona fender. The faint marks left by the stretcher are still evident on both sides of this particular car's moldings. The lines aren't such that you can feel them with your finger, they look more like discolorations grouped about 1/8" or so apart. Although I don't know if the moldings I looked at were original or untouched, it seems logical to me that this could have been the procedure originally used. My questions are as follows: (1) Were the original Daytona moldings just off-the-shelf pieces, modified using the metal stretching method or something like that? It seems that there were only two alternatives, either the Daytona moldings were specially formed to fit that profile or they were off-the-shelf parts modified to fit. (2) If the original method was to modify off-the-shelf parts, did the workers use 1970 moldings, or 1969s? From looking at pictures on the website it is plain to see that the cars were shipped from Hamtramck with moldings on the '69 fenders. Since Creative Industries scavenged and re-used at least some parts (e.g. the hood latches) from the soon-to-be-discarded 1969 sheet metal, perhaps they pulled the '69 moldings off and modified/re-used them?
ANSWER: 1968-70 Charger non-Daytona front and rear wheel opening chrome moldings are all the same part numbers, and all Chargers, all years, had them: 1968-70 front, except Daytona #3004370-1; 1968-70 rear, all #2932110-1; 1968-70 screws, all #6024271. Daytona used special front wheel opening moldings. They were not the ones taken off earmarked Chargers-destined-to-be-Daytonas. This we know because regular Charger front moldings have a screw hole at the front that is not seen on a Daytona molding. (It was not filled, then sanded and polished.) Instead it appears that Daytona front fender moldings were regular Charger front moldings without that normal front screw hole, and with a stretch of the mounting flange area. This stretching is evidenced by the approximately 20 faint, straight lines that appear across the mounting flange. By very carefully stretching the flange area, the arc of the molding was straightened, to meet the front valance panel. A careful inspection of moldings from two Daytonas showed that the moldings all had the stretch marks. The moldings appear to be hand cut at the lower, front end. The moldings were not an identical length. Also, the single screw that attaches the molding to the Daytona valance was not uniform. The fender molding screw holes, on the inspected moldings, were randomly located. Therefore, it appears that the front fender Daytona moldings are not identical, nor are the holes in the front valance for the screw!
4. _________________________________________________________
QUESTION: What is the correct date code that I should find for spark plug wires for my Daytona?
ANSWER: I've found that the only 1969 dated reproduction spark plug wires are for the first or third quarter of 1969. No second or fourth quarter plug wires are made at this time. First quarter of 1969 spark plug wires would be fine for your Daytona. Any 1968 dated spark plug wires are way too early for a Daytona of any scheduled production date.
5. _________________________________________________________
QUESTION: I'm restoring a 1969 SuperBee with a mostly white interior. The dash and carpet are black. What color should the headliner be? Also, what about the rear window trim and metal side roof moldings? The metal molding above the windshield is black.
ANSWER: The headliner in a 1968-70 SuperBee is white if the interior is white. And the material is perforated. Metal side window moldings are white, which is dulled-down white code EW-1. It's not pure white. The windshield upper inside metal molding should be black as yours is. A-pillar plastic moldings are black. Rear window inside flexible molding is black. Additional information from Sue George: Most of the interior metal and hard plastic trim pieces in a white interior car of the 1968-70 vintage were not really "white", but almost more of what you would commonly call a light "almond" color. I'm referring to the metal side roof rails, upper metal door frames and door trim pieces, etc. For a perfect match for the 1969 white (almond) pieces use SEM Color Coat Flexible Coating Super White #15103. It's not really "super white"; I don't know why they named it that way.
6. __________________________________________________________
QUESTION: Is the light grey primer used inside the Daytona front fenders the same grey primer used under the car?
ANSWER: For the shade of grey of primer vat color, I checked my 1970 Belvedere quarter panel under it's original undercoating. This was an original paint car, but I don't know if it was built in the Lynch Road or St Louis assembly plant. So, we are only looking at what was in one vat, on one day, and NOT at Hamtramck where your Daytona was built. Using the universal color selector system, called "PANTONE", this vat primer shade is Pantone 440U. How's that for coincidence? Of all the thousands of shades of colors, the best match is 440U, of which "U" stands for "Uncoated". That means no gloss. So you can go to any local printer, whether it be a screen printer, paper products printer, or anywhere that they have the Pantone color chart. Here's the 440U specs: Pantone Green 50.0, Pantone Warm Red 30.0, Pantone Black 20.0. Now for the Daytona hood, fenders, deck lid, nose out shell light grey primer. I found that this Pantone color is a perfect match: Pantone 4374 = Pantone Black 1.0, Pantone Ref. Blue .6, Pantone Trans. White 98.4. This light grey is also found on my NOS fiberglass headlight door, and on the underside of my original paint headlight door. There is a HUGE different in vat grey and special parts grey!
7. _________________________________________________________
QUESTION: My Daytona is all apart. The undercarriage is all apart and I will be repainting it with correct grey primer, with a bit of green overspray. I will also be pulling the engine and transmission and detailing everything. Is there a guide as to the correct original ok stamps and markings? I also have some questions regarding colors of components: (1) Upper control arms -- are they black or natural? (2) Spindles -- natural? (3) Front power disc brake rotor shields -- black or natural? (4) Power steering gear box -- black? (5) Sway bar -- natural? (6) Leaf springs -- natural?
ANSWER: The following is a compilation of my research and that of Scott at MCU Body in Michigan: He will be glad to also help you with the paint markings and ok stamps. (1) Upper and lower control arms are natural finish by blasting. Then use a small flame torch to make each spot weld bluish-black, then cosmoline. (2) Spindles are natural, but could be cosmoline. (3) Rotor shields are black; they are likely dipped in medium gloss paint. (4) Power steering box is very likely medium gloss black, although possibly (unlikely) bare. Be sure you don't tamper with the top valve as it is precisely located on the box. Each piece, meaning valve and box, have a small hole that must be aligned after a factory test. If you move the valve, this may result in the steering wheel being yanked out of your hand. After adjustment, the valve was brushed with approximately a 2-1/2" wide yellow paint, all across. The front located nut-and-screw adjustment is something you can do yourself if needed. This nut will have a daub of white paint. (5) The sway bar is dark grey forged metal, with cheap black paint over it. When it flexed, the black paint was "flexed" off. (6) Leaf springs were natural, unless you have proof of black. Don't forget that the dealer leaf springs should have a natural-colored zinc interleaf in between each leaf.
8. _____________________________________________________________
QUESTION: Did the 1969 Charger 500 and Daytona use special rear window trim clips? A friend has both cars and he contends they use clips different from standard Chargers.
ANSWER: Rear window clips for the Charger 500 and Daytona are the same as any 1968-70 Charger, and are also used on many other cars. The same story for the windshield clips.
9. ____________________________________________________________
QUESTION: I am finishing up the restoration on my 1969 Charger 500. Where do the grille emblems go and what is the correct location for the "Charger 500" taillight panel lettering?
ANSWER: The 1969 Charger 500 grille itself is from the 1968 Coronet 440 model. The "Charger" part of the grille emblem is from the 1968 Charger taillight panel (used by no other car or in any other location). It is part #2840066 and it has two 1/8" studs. The "500" part of the emblem is the same nameplate that is on the taillight panel of the 1969 Charger 500 and is also used on the 1969 Coronet 500 deck lid. It is part #290811 and it uses two 1/8" studs. Unique stud "extenders" were used. They were aluminum tubes with an outside diameter of 3/16", and were 7/8" long. They were held on with flat black "Flat Nuts" measuring 3/8" wide and 5/8" tall. Use Auveco #2103, or buy them at a common parts store. Chrysler's superceded part number for the stud extenders is #9411579 but they are a useless roll pin that won't work. The grille nameplates are centered vertically on the grille, on the left side of the car. Refer to the photos below. Thanks to Don Moody for the photos.


The 1969 Charger 500 taillight panel "500" emblem is borrowed from the 1969 Coronet 500 deck lid, with no changes made to it. It is part #2901811 and has two 1/8" diameter studs. Use one way "speed nuts" to hold the studs. These are also called "barrel nuts" and are available from Auveco as part #2611. They are also available in variety packs from common parts stores. These nuts are NOT a wrench-turned nut! The nameplate studs simply push into the barrel of the nuts (saves assembly time). Use a 5/32" drill bit for the holes in the taillight panel. See the template below. A complete set of grille stud extenders (4), flat nuts (4), and tail light 1/8" speed nuts are available from Performance Car Graphics*.

10. ____________________________________________________________________
QUESTION: My father-in-law owns 1969 Daytona #355155. Here is a photo of numbers that are painted on the fenders. Can you tell me what these numbers mean? Could this be car number two?
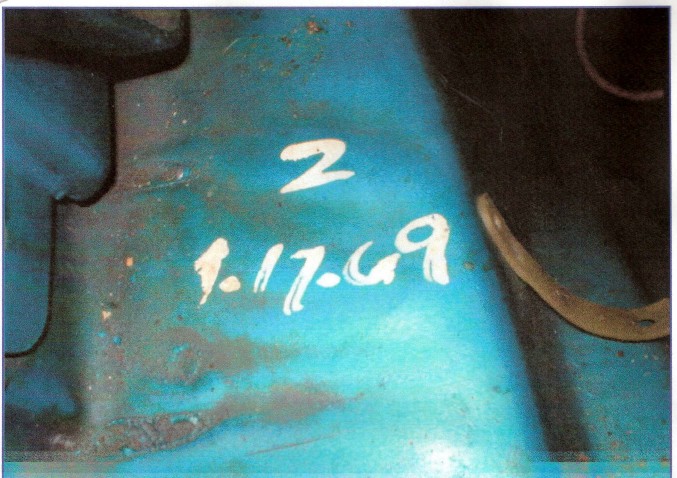
ANSWER: This car is, according to the order of VIN, the 57th Daytona. Sue will have to check the Creative Industries list to see the order in which it was converted from a Charger R/T into a Daytona and shipped to the dealer. This car was scheduled to be built as an "earmarked" Charger R/T on April 27, 1969 (427). The order number of this car is 926098. The broadcast sheet for this car has been found in another car and is available to you. The meaning of the numbers on the fender are unknown to me.
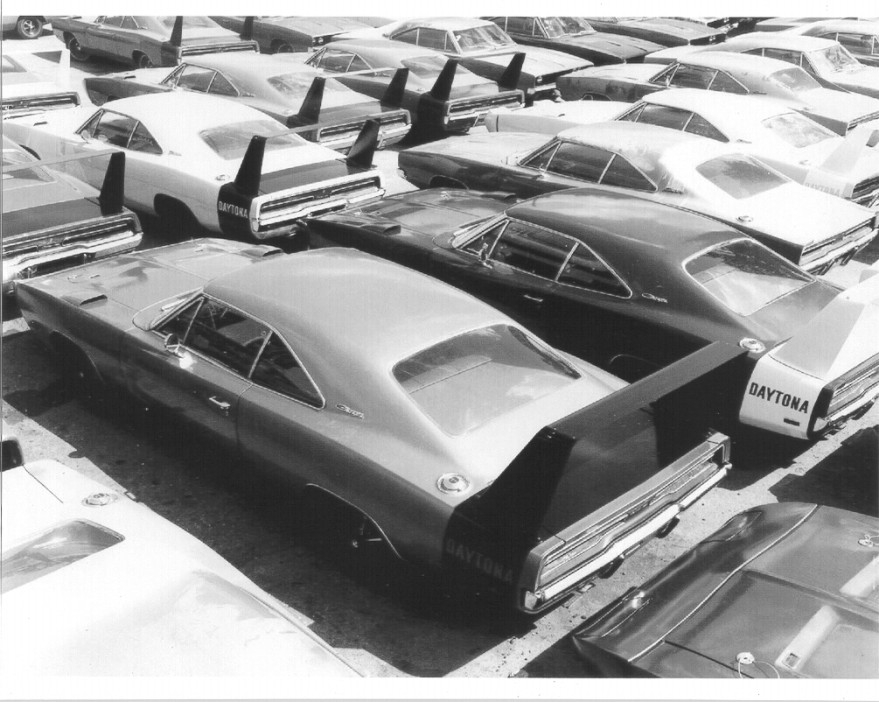
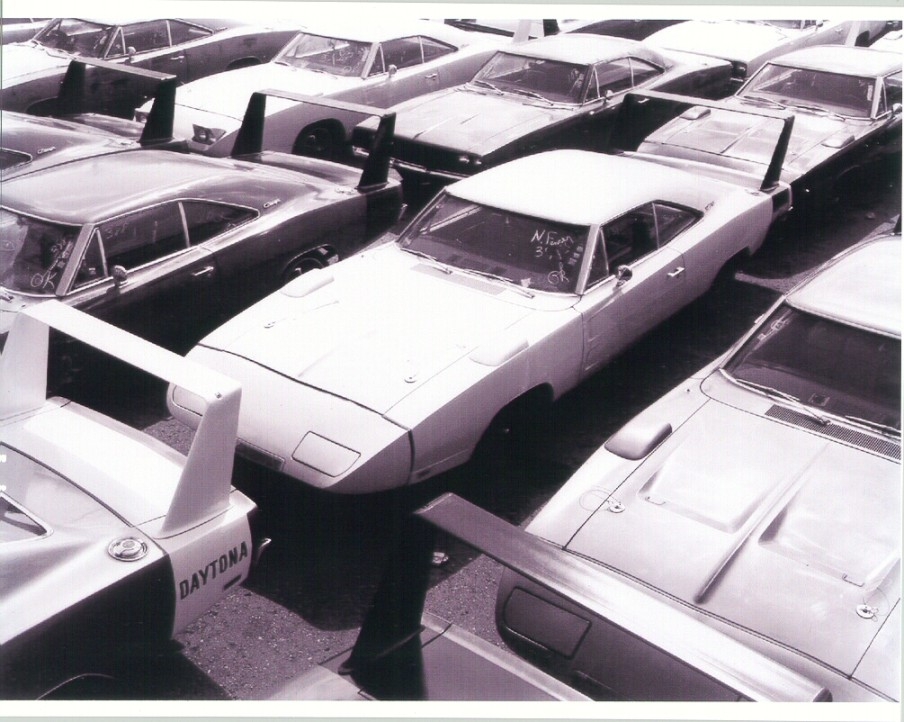
FOLLOW UP ANSWER Thanks to Sue George for the following information: I researched the #355155 Daytona and it definitely was not anywhere near the first cars shipped. According to the Daytona shipping list, it went out as car #274, and was shipped to Beaverton Dodge in Beaverton, Oregon on August 28, 1969. Since the very first Daytona was shipped to Canada on July 27, 1969 and then the remainder of Daytonas started shipping on August 16, 1969, with the very last cars shipping out on September 9, 1969, this Daytona #355155 was very near the middle. It's kind of hard to make out what the first number written on the front fender is...could that be 8-17-69? If so, then it seems likely that those numbers designate when the fender was actually installed on the car. That would mean the car was built as a Daytona on August 17th--a full eleven days before it was shipped. This seems likely to me, since the records show it was the 57th Daytona built and it was the 274th car to be shipped out, it had to sit somewhere for many days. And we have photos showing the parking lot at the Hamtramck assembly plant full of Daytonas that were built and waiting to be shipped to dealers.
11.__________________________________________________
QUESTION: I am working on a friend's 1970 Charger. One of the parts he has is the headlight delay relay. We have looked all over his car and I have checked out many others and I cannot find it on the cars. The Chrysler part number is 2947394. Have you heard of this part being on a 1970 Charger?
ANSWER: The 1970 Chargers that I've owned had relays that were on top of the lowest rail on the seat side of the dash frame. In other words, the underside of the dash frame, where your knees are. There were two relays in each of the cars I've owned. One was about in the center of the dash, the other was at the extreme right. I cannot remember which relay was for what purpose. The dash frame rails have pre-stamped holes for these relays, as I recall. The screw was a phillips head, only one screw per relay was used. The relay's small attachment had a small tab, which fitted into a small hole on the dash frame, right next to the attachment screw. This prevented the relay from turning while the screw was being tightened. I am only assuming that the purpose of a relay in the electrical circuit of a 1970 Charger is to provide the on/off switching for the headlight doors. This takes that job away from the electric headlight switch, which has enough work to do just turning the bulbs on and off.
12.____________________________________________________
QUESTION: What color is the inside of the Daytona lower valance supposed to be, natural or flat black, or flat black only in the portion visible from the inside of the front wheel well area, or grey primer? Right now mine are body color.
ANSWER: How to paint the front end of a Daytona like Creative Industries painted it: (1) Remove the original 1969 Charger front bumper, hood, fenders, valance. Leave on the fender rear splash shields. (2) Weld to upper radiator yoke the hood latch tray bracket. (3) Install special Daytona hood, fenders, valance. (4) Install air block-off seals to the front of inner fenders. (5) Install nose-to-fender seals. (6) Use a can of spray flat black to quickly paint the area of front of inner front fenders, over-spraying the air block-off seal that is already installed. (7) Also spray black, on some cars, the inside of the valance panel area that is forward of these seals. (8) Also spray black, on some cars, the top of the hood latch tray bracket that has been welded to the radiator upper yoke. (9) Install nose assembly, and mask off nose-to-fender seal top and side, and mask off hood-to-nose seal. (10) Color coat car on new front end, roof and deck lid.
13._____________________________________________________
QUESTION: Are the inside of the Daytona front fenders gray primer only? Is the underside of the hood painted body color after grey primer? What finish should be on the screens inside the front fenders (under the scoops)? Is the inside of the nosecone grey primer or bare steel?
ANSWER: These parts were all painted with a spray gun, before any assembly to the car, and they were all the light grey primer: headlight door fiberglass, nose shell inside and out, three-piece wing, hood, fenders, front valance and deck lid. The fender screens were welded into the fender when both were bare steel. The scoop hole in the fender appears to be hand-cut. Screens were primered along with the rest of the fender. The deck lid, hood and fenders were installed on the car while these parts were all still in the light grey primer. The nose shell inside is painted the satin black before any parts were installed in it. Rivinuts have black paint on their insides. Color was painted on the three wing pieces after those three pieces were bolted together, but not on the car. The wing adjustment is "parallel to the ground", meaning flush fit. Inside of the front fenders were never color coated, nor undercoated. The fast back (window plug) was welded in while in bare metal. Color coat was applied to these parts when all were installed: nose, headlight doors, hood, valance, fenders, fast back, deck lid, roof, tops of quarters. Fender scoops were painted off the car.
14. _______________________________________________________
QUESTION: My Daytona's vacuum headlight motors need to be rebuilt. How do I get this done?
ANSWER: You can rebuild the vacuum headlight motors yourself, but they are difficult to take apart. The main problem is that the "o" rings inside harden. But the other problem is filth throughout the vacuum hoses, canister, motors and the headlight switch. Take everything apart, and clean it all. We* can rebuild the vacuum headlight switch. Also you can find NOS vacuum headlight motors quite easily through the internet and Hemmings. Be sure they are the later 1968 and all of 1969 "961" part number. Don't use the earlier ones.
15. ____________________________________________________________
QUESTION: How do I get the correct finish on my Daytona's taillight finish panel?
ANSWER: Originally the paint used was Black Organosol Lacquer. It was applied over the primer, not over the color coat. All you have to do for a perfect match is go to any store that sell Rust-Oleum spray can paints. Buy a can of #7720 Textured Black. For your taillight panel, one can will be enough. Things to remember: (1) Shake the can at least two minutes prior to each coat or the texture will not spray on. (2) This spray paint is HARD to spray on evenly. you must use lots of spray fan. Overlap and do crosshatch strokes. (3) Be sure you don't make wet-or-dry patches with any of the coats. The dry patches are difficult to make wetter on subsequent coats. (4) Apply at least three coats. (5) The Rust-Oleum paint is enamel so it needs to dry well before being touched.
16. ______________________________________________________
QUESTION: Have you ever seen a black Charger with a black bumblebee stripe? I have a 1968 Charger and want to put a black R/T bumblebee stripe on it and I would also like to install the hood black-out on it. The stripe kit is in matte black so it will show up, I guess.
ANSWER: Any 1968-70 Dodge car that had a bumblebee stripe could indeed have a gloss stripe on a black car body. These have been seen, but rarely of course. We* have the bumblebee stripe available and matte black vinyl inserts for the Charger hood depressions. The 1968 Charger had no optional hood and cowl black-out available. That was an option on both 1969 and 1970 Charger. Both used Black Organasol paint. Vinyl tape will not conform to compound curves. The 1968 Charger bumblebee stripe can be made for you in matte black as a custom order, and the price will be the same as the gloss black stripe.
17. _______________________________________________________
QUESTION: Which bumper jack is correct for my 1969 Charger?
ANSWER: All 1968-70 Belvederes and Coronets are found originally to have hollow tube post jacks or solid tee post jacks. This includes the Superbird rear jack. Usually the hollow tube jack will have a black base and hook while the solid tee post jack will have a grey base and hook. The 1968-70 Chargers always had a solid tee post jack with grey base and bumper cradle. I have never seen one of these in black.
18. _______________________________________________________
QUESTION: A Dart owner told me that my 1969 Charger 500 outer door handle knobs are wrong because they are black plastic. He says they should always be chrome. What is correct?
ANSWER: My 1969 Charger 500, car #232003, was made the same day as yours. Its outer door handle knobs are black plastic, and they haven't been changed from original.
19. ________________________________________________________
QUESTION: What size inlet did the 440HP Daytona's fuel pump have?
ANSWER: All Daytona 440 cars used 5/16" fuel lines.
20. ________________________________________________________
QUESTION: I have a 1969 Super Bee that I am ready to have restored. I have picked up all the interior parts I need and have taken the car as far as I can on my own. Now it needs to be stripped and painted. The car was originally Y3 cream which is the color that I would like to get it back to. It's a 4-speed, air-conditioned car with all numbers matching and I feel that it should be painted back to Y3. Do you know of any honest and fair paint shops that specialize in Mopars?
ANSWER: Things to consider when choosing a restoration shop: (1) Their knowledge of order-of-assembly of cars like yours. If they don't know that, they will make many mistakes with paint, oversprays, undercoating, etc. (2) Their knowledge of original hardware, compared to hardware store hardware. Most cars I see that are "restored" use generic hardware. This kills the value of the car! (3) Their knowledge of durability of paints, fillers, primers and undercoating. Think restoring a car is hard and expensive? Try doing it again in a few years, when the putty shrinks, the cheap anodizing/coating is already rusting! (4) Their craftsmanship in welding, blasting and tiny details. For example, a bead weld on a piece of metal that should be spot welded will never look right. Failure to remove rust and old paint from metal crevices will surely result in the surrounding new paint failing. Where to find such a shop in your area? Buy a copy of Hemmings Motor News. Use it two ways: First, look at the restoration shop ads under "Services Offered". Ask them the questions we just went over. Second, call the sellers of good cars, the older the car the better, and ask they seller who did the work on the car they are selling. Limit your calls to sellers of classics that have been restored to original condition.
21. ________________________________________________________
QUESTION: I've seen several different Carter AFB and AVS carburetors and noticed that several of them are stamped with "S" or "SA" after the list number. I need a #4617 for my Daytona restoration but am confused by the stampings. What does this mean?
ANSWER: Gene Lewis spent a long time on the phone with R.D. (Dick) Katter discussing exactly that subject. Dick is an expert on Mopar AVS and AFB carburetors and does all of Roger Gibson's carburetor restoration work. Mr Katter told Gene that the "SA" designation infers that there was a factory-made change to the original carburetor design. The change could be any number of things, such as different jetting, different metering rods, plugged vs. unplugged idle mixture screws (or vice-versa), etc. He also said that he has seen "SB" designations, which indicates a second set of factory changes from the original carburetor settings/design have been made! Carbs with a suffix beyond "S" are supposed to be the mid-year "new and improved" versions of that particular carburetor. Service replacement parts would likely be these later-issue carbs with the SA designation, but SA carbs were definitely installed on the assembly line. At any rate, Mr Katter checked his supply of #4617 carburetors and it appears that sometime in January (1969) a change was made to the original 4617S setup. He said that there was a separate idle adjustment screw in the top part of the base that is present on early-built 4617s, that was removed from the 4617SAs. It was a 10-32 LEFT-HANDED threaded screw, that he said was a real pain. Another change was that the 4617s have plugged-up (non-adjustable) idle mixture screws at the bottom of the carb, whereas the 4617SAs have the adjustable screw heads sticking out. More than likely, if you find a carburetor with the right part number, the right month and year for your car's build date, you will have the correct suffix. The presence or absence of the suffix is based on what version of the carburetor they were making, and once they switched, they didn't appear to go back to the previous style. In summary, Mr Katter states that carburetors assembled and stamped sometime in January 1969 (A9 date-coded) through the end of that series should have a 4617SA designation. You're actually in a better position to use the SA carb since its idle mixing screws are adjustable whereas the S-carb's are not.
22. ____________________________________________________________
QUESTION: I am thinking of repainting the exterior of my Daytona again and want to ask your opinion about what type of paint to use. Would you recommend going back to an enamel or to use a more durable paint like a Dupon Chroma base/clear coat? Also, would it be better to paint the car and the nose with the nose assembled on the car?
ANSWER: I talked to Jay at Car Quest and he told me several things. First, how much like the car's original paint appearance do you want the car to have now? Second, how important is durability, considering your climate? Heating, cooling, sun, humidity are all considerations. Third, correctness of color match is more likely in some brands and some types of paint than others. The original Charger R/T paint job on your unconverted car on the assembly line was acrylic enamel. The second paint job over the Daytona parts was likely acrylic enamel. The wing was painted with lacquer. Jay sells Dupont and Nason paints. The color match will be exact in those brands, if it is mixed there. Your paint person will have the formula for Dupa Chroma basecoat/clearcoat. If you want a modern-looking paint job, use this paint. But if you want originality, you should go with acrylic enamel with a hardener.
23. _______________________________________________________
QUESTION: What method of welding did the factory use to install the Daytona window plug?
ANSWER: A welding torch and rod was used to attach the plug to the original roof area.
24. ______________________________________________________
QUESTION: The speedometer in my Dodge Charger has faded and I would like to either replace the speedo face or restore mine somehow and would like to know if you could help.
ANSWER: The first thing to do, since you are so far away from us, is find out if your speedometer is okay mechanically. Is the speedometer in the dash yet, or is the cluster out of the car? If the speedo has ever been observed by you as you drove the car, was the needle steady, or did it wander and jump? If it wandered or jumped, did you try pulling all of the cable from the sheath and try lubricating it? If the speedo is out of the cluster, here's how to check its health: notice how a bipolar magnet is outbound the aluminum wheel. Grasp the bipolar magnet, firmly, and see how much play there is. If it can contact the wheel, the plastic driveshaft in the speedo head is likely broken. If the magnet-grasping shows a lot of play on the end where the cable fits in, the sleeve in the head is worn out. If the needle does not return to zero, and floats, and the aluminum wheel has a lot of play, the front plate pivot bearing is likely blown. but if all seems okay, we* have do-it-yourself face kit available. If you want us to restore the entire speedo, we strip the face to bare metal, paint it, letter it, bake it on. Then we paint the needle, calibrate the speedo. We can also reletter the odometer wheel. If anything is worn or broken in the speedo, it can be totally rebuilt.
25. ________________________________________________
QUESTION: I have a 1968 Charger in the body shop right now. It's going to be red with a white stripe. Should I put the stripe on before the clear coat or after?
ANSWER: If you clear coat over a stripe, and put on lots of clear coats, your stripe will look like it's way down under the clear. If you base coat, then apply a normal number of clear coats, then the stripe, it will all look like what most people call "normal". Remember that the original colorcoat on a 1968 Charger had lots of orange peel, and no clear coats at all. If you apply lots of clear coats, then apply the stripe, the stripe will look like it's floating above the clearcoats. This is true whether you then clearcoat over the stripe or not.
26. ___________________________________________________
QUESTION: I am planning to order some decals from you. I have a SuperBee and need a public law decal, the Scat Pack bees and the performance hood blackout. Are these available?
ANSWER: What year SuperBee do you have? Only the 1968 and 1969 cars used the Public Law decals. Scat Pack bees are different than Scat Pack factory bees. Only 1970 cars used small, inside-of-window factory bees without any lettering. Every A and B-body Dodge with at least a 340 engine had these quarter window bees on the inside of the quarter windows. The bees were contour-following cut outs of clear material, onto which the five color prints were made. Scat Pack Club bees were never put on a new car at the assembly line. Club bees for 1968 were inside-of-window 6" circles. They were orange-pink-black-white-grey. Club bees 1969-70 were 4" circles, for inside-of-window. They were white-black-yellow-blue-red. The 1971 Club bees were completely different. They were 6" circles for the outer body or outside-of-window. Colors were orange-black-pink on chrome foil.
27. ___________________________________________________
QUESTION: Will 1968 Charger C-roof pillar "Charger" emblems fit on a 1967 Charger?
ANSWER: They are two different emblems. The 1966-67 C-pillar "Charger" emblem is part number 2602638. The 1968-70 C-pillar "Charger" emblem is part number 2841886-7 and the 1972 C-pillar "Charger" emblem is part number 2680354-5.
28. ___________________________________________________
QUESTION: My question has to do with the 1968 SuperBee tail panel "bee" emblem. In 1968, was this emblem a paper emblem or a metal emblem attached by screws? It goes next to the DODGE letters on the right side.
ANSWER: The1968 SuperBee taillight bee is a decal. It is a black and yellow print on white reflective material. It is die-cut, which means that there is no clear film. The bee runs to the right, and is centered from side-to-side, I believe, between the "E" of Dodge and the taillight. It is centered vertically in the recess.
29.__________________________________________________
QUESTION: I have what appears to be an all original Daytona. The flip top fuel cap is chrome. I ordered a new one from Year One and when it came it was painted black around the letters. Is the new one correct or has all the black worn off the original fuel cap on my car?
ANSWER: My cars all have black paint on the fuel caps. It is extremely unlikely any of them had an owner that painted the fuel cap black because I have owned these cars over 25 years now. So I'd say the black paint around the lettering is correct.
30. ____________________________________________________
QUESTION: Did Creative Industries take out, and then replace the rear side marker reflectors on Daytonas? I can't think of any good reason they would need to do that. Should the frame of the marker be body color or stripe color? Someone has picked up on the fact that, on my green car, the rear marker frame has some red paint showing where some paint has peeled off.
ANSWER: Okay, here's the story of the Charger 500 and Daytona conversions as done by Creative Industries: (1) Charger 500s and Daytonas were built as "earmarked" 1969 Charger R/Ts in every way except as noted here.
(2) "Earmarked" means that these cars were destined before any assembly to become Charger 500s and Daytonas. These were two different runs of cars: late 1968 for Charger 500s and early to mid-1969 for Daytonas.
(3) No normal grille was installed in any of these cars. In fact, no grille at all was installed.
4) Both runs had regular 1969 Charger fenders and hoods, front bumpers, headlights, wiring, etc.
(5) Both runs had "V88" stripe delete codes, meaning "Do not install any bumblebee stripe, and do not install quarter panel or taillight panel "R/T" metal emblems. Some mistakes did get through and the holes had to be filled at Creative.
(6) A very few Charger 500 early-run earmarked cars were given XS VIN by mistake. All fender tags, dash plates and body numbers on cars of both runs were stamped prior to assembly and painting. There was never any changing of numbers before, during or after conversions.
(7) Since no stripes at all should have been installed on any of the earmarked cars, the marker light frames would all be body color.
(8) Rear marker light frames only are installed after the car is primed, but before it is color painted. That's why you will see only primer on the quarter panel where the marker meets it.
(9) The fiber gasket between the marker frame and the outer quarter panel area will have body-colored paint on the earmarked cars, before the conversion was done.
(10) This means that the marker light frame and the gaskets on both runs of cars, before conversion, will be of every colored car made.
(11) The inside of the marker reflector, inside the trunk will originally have the same colored paint on it and the attaching bracket.
(12) The quarter marker lens was not installed, on any car, until after the car was color-coated. If it was, the high heat of the baking oven would have melted it.
(13) When each car of each run was at Creative Industries for conversion, they were in the conversion area in small batches.
(14) Every car was supposed to get a bumblebee stripe (although it appears to have been possible to delete a stripe). Stripes were only available in tomato (R4) red, black or white.
(15) Marker light assemblies were all removed, and put into piles for those cars in the batch inside the building at that time.
(16) The marker light frame is always stripe color on any 1969 Dodge that has a bumblebee stripe. Lots of people get this wrong and paint theirs body color.
(17) Assembly people at Creative Industries installed the stripe color that was specified to them (if one was specified at all by the person ordering the car).
(18) If no stripe color was specified, it appears that Creative people installing the stripes simply put on any colored stripe. My Charger 500 F8 green car came with a red stripe!
(19) The stripe area bridged over the marker light hole in the quarter panel was "x-ed" with a razor blade. Excess material was NOT removed.
(20) If a marker frame from a black car or an R4 red car was in the pile, it was installed. Those were the only two frames that didn't need to be painted to match the stripe color.
(21) White colored cars use an off-white paint on the body. White wings and white stripes were pure white, called "refrigerator white".
(22) All of the brown, green, yellow, etc., marker light frames in the pile were painted stripe color, while off the car for their intended car.
(23) The marker les was not removed; it was only masked off, before color coating. No primer was used first over the original marker light frame.
31. _____________________________________________________________
QUESTION: How do the stainless steel moldings attach to the Daytona A-pillars?
ANSWER: The A-pillar moldings on a Daytona or Charger 500 fit into the separation of the windshield gasket. Holes were drilled at Creative Industries into the A-pillars. These holes should line up with the holes in the moldings. Sometimes the location where the hole was drilled meant that the drill bit was right next to the glass! In fact, I'll bet a fair number of windshields were cracked from this drilling. You will have to poke around your windshield rubber to see where the holes are in the A-pillar metal.
32. _________________________________________________________
QUESTION: I have a Canadian Daytona with long rectangular holes cut into the rear package tray and no speaker. It appears to be a rear window defogger?
ANSWER: Both Charger 500s and Daytonas that were Canada-bound had the optional rear window defogger. Those are the long holes you see in the package shelf. The only problem was they were installed in the regular Charger location in the rear deck, which meant that the defogger did little good once the rear window was repositioned further back in the new fast back!
33. ________________________________________________________
QUESTION: Should there be a "Charger" emblem or an "R/T" emblem on the sail panel of my Daytona?
ANSWER: The Daytona C-post gets the normal "Charger" nameplate unless the Daytona has the SE package. The taillight panel gets the "Charger with the logo emblem". A mistake on the assembly line resulted in the metal emblem "R/T" getting installed on the taillight panel and even on the quarters. This was done when the car was being built as an "earmarked" R/T. Of course, the quarter "R/T" emblem holes had to be leaded over. A very few cars made it out of Creative Industries with the "R/T" on the taillight panel. The "V88" code was supposed to prevent that.
34. _______________________________________________________
QUESTION: Was an automatic trunk lock an available option on a Daytona?
ANSWER: The automatic trunk lock was a dealer-installed option available on just about any car. I've never seen any NASCAR street car that had one from the factory.
35. ____________________________________________________
QUESTION: The NOS fastback plug that I bought for my clone Daytona did not have the headliner teeth on it. Where do I find the same teeth and how are they attached to the plug?
ANSWER: Dodge fastback headliner teeth appear to be unique stampings. They are all around the inside of the window except on the bottom. The stampings are welded by arc welding onto the fastback metal. The teeth end up being spaced 1/4" below the rear window ledge (where the glass sits). The teeth protrude on average of 5/16" inboard of the inside of the glass ledge. The teeth stampings double as brackets for attaching the rear glass chrome molding clips. It is very unlikely that these teeth stampings have ever been available from Chrysler, although the 1969 Parts Catalog mentions them. You'd better plan on adapting standard 1968-70 Charger rear window teeth to your plug.
36. ___________________________________________________
QUESTION: What 4bbl fresh air cars received the big oval 6bbl/Hemi style lid? I put this lid on my 1970 SuperBee but received questions about it all the time whether it was correct or not, but it certainly did look better.
ANSWER: For the 1969 RoadRunner, GTX, SuperBee and Coronet R/T, applicable 383 4bbl and 440 4bbl engines had an oval element if the car had a fresh air system. This was true for 1969 only. This air cleaner element is part #2946186. For 1970 and 1972 B-body 383 4bbl and 440 4bbl engine with a fresh air system, used the short round element, part #2863349. Only 440 6bbl and 425 Hemi engines used the oval element. A 1970 SuperBee was available with the 383 4bbl, 440 6bbl, and 426 Hemi. If you have the 383 4bbl, the correct Ramcharger system would include the fiberglass ducting under the hood, a large air cleaner with metal black base with the short round element and a small round, orange lid. No pie tin was used.
37. ___________________________________________________
QUESTION: I have a 1969 Charger R/T I bought from the original owner. I sold it 12 years ago and just bought it back. Was the trunk compartment originally splatter painted or painted the color of the car?
ANSWER: Cars from the time period of your 1969 Charger were dunked in dark grey primer up to the level of their front and rear light areas. At this stage, the car was a bare steel shell, nothing more than sheet metal. After a few other preparatory operations, the car reached the paint booth. It was color-coated by using spray guns. The guys reached into the trunk all around, but not up into the rear window area from inside the trunk. That remained bare steel. The cars never had any other type of paint applied in any way in the trunk area.
38. ___________________________________________________
QUESTION: I recently purchased a Daytona and need to find red interior piece for it. What do I look for?
ANSWER: All the red interior pieces are unique to 1969 B-body Rallye dashes. In 1968, these pieces were actually maroon, so none of those dash pieces will be right. Very, very few 1969 cars were built with red Rallye interiors. I don't know of anyone anywhere who has anything.
39. __________________________________________________
QUESTION: I have an "M" code 1969 SuperBee, built at Lynch Road in March 1969. I am slowly dismantling it in order to restore it. The other day I pulled off the wheel lip moldings and found the following colors. On top of the original sheet metal I found grey primer, on top of that I found a "red" paint, on top of that I found another grey primer, on top of that I found the body color. I just looked at another original paint SuperBee and found that it only had the following combination: original sheet metal, with grey primer on top of that and then body color. Does this sound normal to you? By the way, these two cars are different colors. Mine is F6 bright green and the other is B5 blue.
ANSWER: A short answer to your question is that the cars were built in bare metal (except for the quarter panel and door panel sound deadener). The cars were sent from the Metal Shop to the dip tanks. Here the insides and undersides and the outside was coated with a dark grey primer. It was then washed off the outsides. Then the remaining dip primer was baked on. The outsides of the car were sanded, cleaned and sprayed with primer. I believe this first coat was always a light grey primer. I have yet to receive any evidence of red primer being used as the initial spray primer. If it was used at all later, it would likely be related to the body color. There were no robots painting cars then, so it would have been difficult for the two guys in the color booth to accurately paint white, for example, over light grey primer.
40. ___________________________________________________
QUESTION: Being an ex-avid USAC and NASCAR fan (my dad used to drag me around the country to countless, some even dirt, shows) I still have to take you to task on the number of Daytonas remaining. In 1969, Chrysler had to build at least 500 Daytonas and the actual count being 503, 504 cars. Some of the Dodge teams had to have used three, four or five cars each, didn't they? I mean, how many teams used those cars in just USAC? Everyone had some. One team, Norm Nelson (Roger McCluskey's owner) consumed 20 Superbirds alone! Between racing series' attrition and highway accidents and scrapping, how could there possibly be 350 Daytonas left?
ANSWER: Circle track's top racing teams, owners and car builders were able to afford cars and equipment that poorer teams could not. And this hierarchy extended all the way down from Grand National, to Sportsman, to USAC, to IMCA, to county fairgrounds track racing. NASCAR's top teams of the 1950s and early 1960s bought one or two maximum performance new cars from their dealerships for the following season of racing. And it basically stayed a new car as built, inside and outside. Not much was subtracted from it beyond the passenger seats. The car was strengthened with minor bracing in some high stress areas, and high performance coolers and filters were added in later years. A simple roll cage was installed by the mid 1950s. It was mandated often to be built ever more rigid and more complicated. The original instrument cluster was removed, and a set of simple, easy-to-read gauges were installed. The top teams used engines, transmissions and rear ends that were the highest performance parts assemblies offered by the car companies for that year's line-up of street cars. So, during this time (1950s), a very high percentage of the very rare "super high performance cars" built for the street became circle track race cars. That's what they were intended to be by the car maker. Only a tiny few of them survived as street-driven examples.
NASCAR Grand National top teams of the mid-1960s and the late 1960s benefited tremendously from car company factory support. This meant engineering data, special parts, free parts, and factory testing knowledge was shared. No longer did the top teams of NASCAR buy the hottest muscle car from the local dealer. Instead, a body-in-white was given to these top teams. In fact, each top team received several body-in-white cars. These cars were not always body-in-white shells. In late 1966, Richard Petty went to the St Louis assembly plant to pick up his 1967 Belvedere. It was all there except for undercoating, sealers and a few other items. It was a marginally-drivable car, but he trailered it home. He asked repeatedly if it was built as light-weight as absolutely possible. In later 1967, the Hamtramck, Michigan assembly plant in one day built 50 or so 1968 Charger body-in-white cars for the top Grand National teams. These became the top circle track race cars of the 1968 NASCAR season, which began at Daytona Speedway. It was the obvious aerodynamic problems with those 1968 Charger stock cars that necessitated the test of air flow under, over and around them. The 1969 Charger 500 was developed as a solution. The 1969 season Grand National teams converted the surviving 1968 Chargers into 1969 Charger 500 race cars. Later in the 1969 season, Chrysler sent--via each race team's local Chrysler dealership--all the sheet metal and parts to make the same Charger 500 race cars into Daytonas. For some unexplained reason, the front valance of a Daytona was never available to the race teams for free, so the car builders had to fabricate their own valance. As late as 1974, Chrysler still sold bodies-in-white to anyone, for any purpose. This included the Charger, RoadRunner, Duster and Dart. All you had to do was give the assembly plant of your choice four weeks notice, and your phone number. See the accompanying reprints from the 1974 Direct Connection Catalog below. Note the last paragraph and listing of available models.
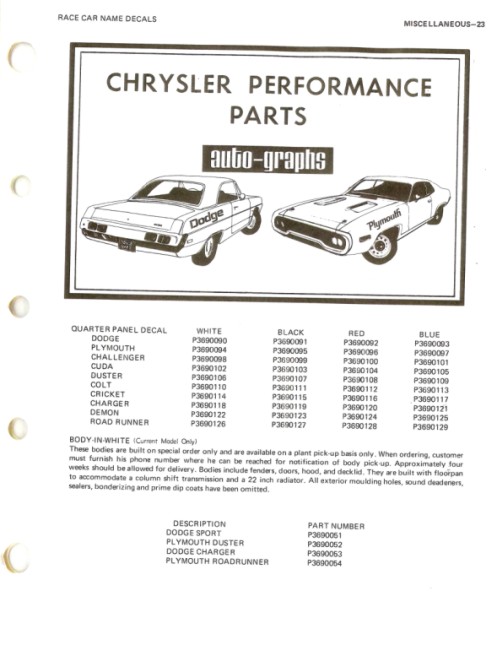
So what does this mean for the street versions of the NASCAR special bodied cars? Well, it means that the top teams of NASCAR and USAC didn't use many, if any, street cars for circle track racers. In 1969, the Cedar Rapids Gazette ran a story about regional racer Ramo Stott building a race Superbird for the high-speed tracks. The car still exists today (owned by club member Ken Noffsinger). It began as a body-in-white. But at the lower levels of circle track racing, new car builders did begin with a street car. Late in 1968, IMCA and sometime USAC driver Irv Janey, of Cedar Rapids, Iowa went to Handler Dodge-Chrysler in Cedar Rapids, Iowa. He bought, and drove to his race shop, a new 1969 Charger 500. It was a Hemi car, red with black interior and a 4-speed. It was made into a circle track race car by the Janey racing family. Thirty years ago, I asked Irv Janey what happened to it after the race season. He looked perplexed and asked why anyone would care about that. He said, "I suppose it's in a junkyard in Indiana somewhere. How would I know?" There was absolutely zero interest in a race car's history, or fate, among the race car people. To this date, I have never heard of anything more on that car. It's VIN is likely indeed to be on the list of street Charger 500 cars built. To this date, I have never found any record of it. Handler Motors people knew nothing about it when I asked them. In fact, they had no idea that a Daytona was a car they could have sold new. Their ideal car was an Imperial!
If we consider what poorer race teams, owners, and builders of the 1960s did, then it's likely that a small number of special bodied street cars did become circle track cars. Many years ago, in the Winged Warriors newsletter, there was a story about such a Superbird. A man and his wife went to their local Plymouth dealer, somewhere in the Midwest. They picked up the 440+6 Superbird they had just bought new (and had possibly ordered). The wife drove it home, on its only street journey ever. The same day, is conversion to a stock car began. No name or number of this car has ever been found. Race teams that had even less dollars available simply bought a used, common car, possibly a front end late-model wreck. The guys had to make or buy whatever speed equipment they could afford. A good example of a home-made race car is from our own club member Stan McGuire. He was part of a circle track team that built a circle track RoadRunner. They raced it two or three yuears on dirt tracks around southern Iowa. The car began as a "throw away" 383 RoadRunner body. A C-body full frame chassis was put under the RoadRunner unibody, because the guys felt that a unibody would not stand up to the rough life on a dirt track. A 440 engine was used. Stan remembers that all the chassis parts they bought for this car were for a C-body. In one race, this car finished third. Lots of fun and camaraderie was had in this young man's team effort, but the ever-increasing time demands left Stan with no choice but to leave the team. This was in the early 1970s. But overall, few street NASCARs were converted to stock cars. Most of the "missing ones" were wrecked by drunken idiots is my guess. Very, very few remain undiscovered.
41. ___________________________________________________
QUESTION: I am thinking about putting larger (taller) wheels on my Daytona. My car has the original standard 14-inch Ralley wheels which are fine for the shows and times we are at Winged Warriors meets, however, I want to put 15-inch wheels on the car for normal driving. Such a move will limit possible damage to the original wheels, and perhaps lower the engine RPMs in routine operation. I have looked at a set of wheels that were advertised as Chrysler Rallye wheels, however, they are the 15-inch wheels that the Superbird came with, not the Daytona. They were also listed as having a 4-1/2" center, and as far as I can determine my wheels have a 4" center. I want to stick with Chrysler style wheels, or go to the older 1960s style mags offered by companies like American Racing. What is the standard width of the stock wheels? Any recommendations?
ANSWER: The 15" original wheels for 1969 were 6.0" wide. The 15" wheels for 1970 were 7.0" wide. If you change from 14" wheels to 15" wheels, you will have to change your speedometer pinion in the transmission (assuming tire circumference increases over the 14" tire). Look at the countless custom and hot rod magazines for styles of wheels. If your Daytona has disc brakes on the front, make sure the wheels you buy will fit around the calipers. Rallye wheels for 1970 and up came in 14" and 15" versions. All B-body wheels have 4.5" centers. A-bodies used 4" centers. Imperials used 5" centers.
42. ____________________________________________________
QUESTION: Currently I'm having my 1968 R/T restored by a professional shop. We've run across a possible factory screw-up. This car is a numbers matching Hemi car. It has never been apart. It has never been wrecked or damaged to require any body replacement. The trunk VIN and radiator yoke VIN all match. The problem is this. The passenger's side radiator side support has been cut. It was cut to allow for a 26" radiator (which was a Hemi requirement). The piece that is on the car is clearly a 22" side piece. The driver's side is the correct 26" opening piece. Herein lies the paradox--it was cut prior to painting the car. Could this be a factory screw-up? If you look at where they cut the support to accommodate the larger radiator, there is no collateral paint damage. Underneath the factory black-out in the front is white paint, and it overlaps the torched area. On the engine compartment side there is white paint which also overlaps the torched piece. It is clear that the piece got painted after being torched, otherwise the paint in the area of the torch would have been affected and it is not. The entire radiator yoke, support and fenders still have the factory spot welds with no signs of being cut or tampered with. Is it possible that the chassis was being assembled, they ran out of out passenger side pieces necessary for the 26" radiators and placed a 22" on to torch later, or they just put the wrong piece on and realized the mistake and corrected it prior to painting? After all, there were lemons back then and we are dealing with assembly line workers. Anyway, the only sad part is having to restore the car for certification with a less-than-perfect radiator support.
ANSWER: Your 1968 B-body radiator yoke mistake looks like just that--an assembly line error. I wonder if the person responsible for it secretly cut away the 22" piece, or did a supervisor on the line give the okay? By this time, in the plant's Metal Shop, the entire quarter panel area, roof, etc., would all be welded on. The Hemi reinforcements on the rear clip would have been there. What else could the line people do except junk the body, or cut it out like they did. Make good, well-marked photos for your display at car shows, and people will be fascinated by this.
43. ______________________________________________
QUESTION: I have a 1970 SuperBee, 383, console, bucket seats and automatic. It's pretty original with under 40,000 miles on it. I purchased it from a little old lady in Mississippi. It is FY1 Top Banana with a white vinyl roof and white stripe. It has 15" steel painted wheels and dog dish hubcaps, also tinted glass all around and air conditioning. Would you consider this a rare combination? The Bee has the performance bump hood, not the two scoops. Should the side of the bump have a SuperBee emblem? Also what would the correct pie tin for the dual snorkel air cleaner? All the numbers match and under the rear seat resides a near perfect broadcast sheet.
ANSWER: Regarding the "rare combo" question, this is a very common car in every way, especially in the south of the US, where most cars, even thirty years ago, had air conditioning. The hood scoop is the standard hood without fresh air. Yes, "SuperBee" lettering in the form of metal emblems, goes on the sides of the scoops. The dual snorkel air cleaner for a 1970 Dodge car should be the red colored 383 Magnum pie tin, but Dodge cars have been found with orange colored tins.
44. ________________________________________________
QUESTION: What color is correct for painting the wings to match the Daytona red and black decals?
ANSWER: Red wings were painted R4 Tomato red and black wings are just pure black. One mistake a lot of people make on Daytonas or any Dodge that has a bumblebee stripe is that they neatly trim out the stripe material that is folded around the side marker opening. The correct way to do that is to make an "X" with a razor blade from corner to corner, diagonally and stuff the reflector in the hole and then push the stripe material out of the way and put the retainer in there.
45. _________________________________________________
QUESTION: We have a 1967 Coronet Deluxe 2-door sedan. We ordered a back seat cover from Legendary and upon attempting to install it we realized there were some significant differences between our seat bottom and their cover. Their back seat bottom cover is squared off at the forward corners where our seat is quite rounded off. Also, the driveshaft tunnel portion of their cover is a big dome, where our seat and original cover have a long gradual slope on either side. Our build sheet was attached to our original seat, so it was not changed sometime in its life before we got the car. What gives? They have tried to tell us that all 1966-70 2-door seats are the same and maybe the factory screwed up and put a 4-door seat in our car. This is obviously incorrect because I took the seat out of my Superbird and it matches the cover that Legendary sent us, so we installed it in the '67 and it sits too far forward, leaving a large gap between the seat bottom and top. We also bought a back seat bottom out of a '66 Coronet 2-door hardtop and it also matches the characteristics of the Superbird seat. We're thinking that the 1966-67 2-door post sedan used the 4-door back seat but can't prove it yet.
ANSWER: Thanks to Galen Govier for this answer: 1967 Coronet seat material is unique. If your material from Legendary is wrong, it could be that they have never seen what is correct for your 1967 2-door sedan. 1966-67 seat frames are the same for sedans and hardtops, but material changes from 1966 to 1967. 1968 and later frames of seats will all be different than your original 1967 frame.
++++++++++GENERAL RESTORATION QUESTIONS AND ANSWERS++++++++++
1. ______________________________________________________
QUESTION: Do you know how I could remove adhesive from fresh basecoat/clearcoat paint? I just got my car back from the body shop and the vinyl top guys got a little overzealous with the glue. The body shop had no idea what chemical I could use that would be safe.
ANSWER: I have an easy, simple answer. Use a chemical called Naphtha. You can buy it at any hardware store. It is made for removing any kind of adhesive. It is much more effective than Goo Gone and weak stuff like that. It is not expensive at all. But test a non-visible area first, before comitting to wiping and washing a visible area. Be careful not to soften the clearcoat by leaving the Naphtha on more than a minute or two. Clean the Naphtha residue off with isopropyl (rubbing) alcohol. You can buy it anywhere, in any kind of food market, drug store, convenience store, dollar store. Isopropyl alcohol is the only chemical, including water, that leaves no residue. Hint: always use it before applying paint, clear coat, decals, stripes, etc.
2. _______________________________________________________
QUESTION: For people who spray hoods, doors and trunk lids off the car, what is the best process to paint their bolt heads? Do you paint them after they are installed to avoid marring them?
ANSWER: Almost every body bolt or screw on the car had a free-spinning attached washer (called captive washer). Almost all body bolts came to the assembly plant in black oxide. When the car body was dunked in the primer vats, cleaners, etc, these bolts were already in place. A good example is the fender bolts. When the outer body was cleaned, spray painted with primers and color coats, these bolts were already in place. So there was no issue of mangling the new paint on the bolt heads. Note that all body parts and panels and sheetmetal to be painted body color were on the body when it was primed and painted. NASCAR stuff does not apply to this statement. Also, the reason for using captive washers is not only for the sake of making sure the assembly line worker uses a washer. It's also so that when parts are added to the color-painted body, the washer does not move when the bolt is tightened. This greatly prevents the color paint from being mangled.
3. _____________________________________________________
QUESTION: I have seen ads on the internet and elsewhere asking for or advertising a 4-speed crossmember, as if a 4-speed one is different than an automatic transmission crossmember. I can tell no difference between the 1970 B-body 4-speed and automatic crossmember. Is there something I'm missing?
ANSWER: Here is a list of 1966-73 B-body crossmembers (holds rear of transmission to frame rails):
1966 RW w/p floor mount transmission = #2530692
1966-1967 RW w/floor mount transmission = #2530668
1967 RW w/o floor mount transmission up to type = #2530692
1967 RW w/o floor mount transmission after type = #2881938
1968-1969 RW 3-speed automatic and manual = #2881938
1968-69 RW 4-speed manual = #2530668
1970 RW all = #2962040
1970-1971 BJ all = #2962074
1971 RW all = #2962074
1972 BJRW all = #3583188
1973 RW all = #3642794
B=Barracuda; J=Challenger; R=Belvedere; W=Coronet/Charger
4. _________________________________________________
QUESTION: I have a question I hope you can answer. I have asked thirty different people and no one can tell me about this. I have a set of 426 Hemi heads with the casting number 3512105. I would like to know if these are D4 NASCAR heads. No one has ever heard of this casting number. I was told that the D4 426 head casting number is 3512015X.
ANSWER: Here is information from my 426 Hemi Racing Manual, dated June, 1973: 426 Hemi Head D-4 = 3512131. This, I assume, is the assembly/service part number. Your head casting number 3512105 is obviously very close numerically. Sometimes casting numbers are higher than service numbers, sometimes they are lower. I don't have any information that shows what the D-4 "casting number" is. Other numbers that may help you: #2468014 = 1964 cast iron head; #2531108 = 1965 aluminum head; #2945270 = NASCAR; #2780557 = all Street Hemi and 1968 Super Stock head, and NASCAR; #P3690038 = aluminum with two plug holes per cylinder; #P3690210 = cast iron, Race Hemi 1964-68. This is all my manual shows.
5. ____________________________________________________
QUESTION: I have two voltage regulators for my 1969 B-body cars and both have the red/orange lettering. I have come to find out this is not correct. If I send them to you, can you put the correct yellow lettering on them?
ANSWER: If your voltage regulators have red-orange lettering, they are either dealer replacement pieces, or they're from a 1964-67 car. All 1968-69 cars used yellow lettering, meaning new-on-the-car. Yes, we* can strip the covers, repaint them, letter and date them yellow. The covers must be the correct style, meaning that the mounting bolts pass through the covers, and into the cowl metal. If the covers have dents or rust, you must fix that. Do not paint the regulators black. If they are not rusty or dented, do nothing with them before sending them to us.
6. ____________________________________________________
QUESTION: I need to know if this part number is correct for a 1969 B-body radio bezel - #2927930. I need it for a 1969 AM/8-track.
ANSWER: The Chrysler Parts Book shows part #2927930 is the bezel for a 1969 and 1970 B-body Rallye AM/8-track without woodgrain. Must be a Chrysler error, as the 1969 bezel has three mounting holes and 1970 has four mounting holes. They are NOT the same bezel.
7. ______________________________________________________
QUESTION: I don't have any testing equipment, so how do I tell if my alternator gauge is any good?
ANSWER: Here's how to test an alternator gauge without any measuring devise: (1) Use a soft brush to clean the needle pivot area very thoroughly. (2) Make sure the needle has some "play" around the front and rear pivot joints. If the needle stays in a plus or minus position when it's pushed there, there is not enough play. If the needle is nearly falling out of its pivot points, it's too loose. (3) Blow a puff of air with your mouth, on the needle, from side to side. If the needle moves away from the air then returns to the midpoint without more than one bounce, the alternator gauge is okay. If the needle does bounce, the alternator gauge magnet is too weak. (4) A used alternator gauge from us will have a strong magnet, be cleaned and adjusted and have good fiber insulators. (5) If your fiber insulators are wacked or in any way distorted, a fire hazard exists with your car. This problem starts when the heavy wire terminal nuts work loose. Because all of the current to and from the alternator passes through the alternator gauge, these heavy wires and terminals will get very hot if they are loose on the gauge. In fact, the alternator gauge can get so hot, it will burn the black fiber insulators and the cluster housing!
8. ________________________________________________________
QUESTION: I accidentally waxed over the matte black stripes on my car. How do I remove the wax from the stripes?
ANSWER: Thanks to Stan McGuire for this tech tip: Common Windex window cleaner and a toothbrush will clean wax and other discoloration off of matte stripes and decals.
9. ________________________________________________________
QUESTION: How do I tell from the numbers on a mid-to-late 1970s intake manifold what engine it came off of?
ANSWER: Intake manifolds of any year have a casting number built into the die into which the metal is poured. This casting number is rarely exactly the same number as the service part number. That one is found in the Chrysler parts book. Usually, the numbers are numerically very close. The single or double digit that appears on the manifold after the seven-digit part number is the die number. So, if your manifold has casting number 3830733-3, that manifold casting used die #3 (out of how many is unknown to us). More than one die was used for most high-volume parts, in case of breakage, wearing out, or simply keeping up with parts demand. I don't have every parts book from the 1970s, but here's what I found: 1974: #3751729 - 440; 1975: #3830731 - 440; 1977: #3830732 - 440; 1978: 3830732 - E56 and E58.
10. _______________________________________________________
QUESTION: What do I need for installation of the woodgrain on my doors and how do I do the installation?
ANSWER: Items you will need are: Kleen Strip aircraft paint remover, Naphtha adhesive remover solvent, isopropyl alcohol, liquid soap, hot water, spray primer, Dutch Boy "Fresh Look" acrylic enamel Satin Black spray paint, soft clean cloth. Here are step-by-step instructions: (1) The wood grain decals cannot be applied over existing vinyl material, but can be applied over lithographed wood grain on truck door panels. (2) Paint remover can be used to remove existing material from the metal plates. Because paint remover eats plastic, the metal plates must be removed from the door plastic areas. Be very careful when removing the stud nuts from the plates as the studs break very easily. New push-on nuts are available locally or from us at Performance Car Graphics. Push-on nuts also solve the problem of stripped studs. (3) Kleen Strip aircraft paint remover works quite well. Apply paint remover in a heavy layer. When the top layer of material is soft, scrape it off. Do not use water. Only the top layer will easily come off. Do not attempt to remove the decal with a razor blade without using the paint remover--this is very dangerous. (4) Apply a second coat of paint remover to remove the lower layer. Scrape it off. (5) Wash off this second coat with hot water and soap. If anything other than adhesive remains, use the paint remover again. (6) A sticky residue of adhesive will remain. Use Naphtha adhesive remover for this. It is available in any hardware store. (7) Thoroughly clean the bare metal plate with liquid soap and hot water. You must use rubbing alcohol (isopropyl) as a final clean to remove all residue, or the adhesion of the wood will be poor. (8) If some of the metal plate should be painted black, now is the time to do so. Mask off areas not to be painted. Spray primer in a light coat. Spray black in two light coats. Dutch Boy "Fresh Look" acrylic enamel #3751 Satin Black works well. (9) To apply new wood grain decal, remove the paper from the adhesive. Spray the adhesive with window cleaner. Immediately apply the decal to the metal plate. Use a soft clean cloth to squeegee out bubbles. Let it dry for a few minutes and then rub out bubbles. Repeat two or three times. (10) Truck metal trim panels with broken-off tabs: Make a piece of scrap metal similar to the broken-off tab, but with a 1" x 1" square base. Bend the base to fit the backside of the trim panel. Use an epoxy glue to attach the tab, in its correct location, to the trim panel. (11) To remedy stripped studs on Challenger door wood: flatten to the original nut for a tighter fit and/or use a "push-on" nut to help retain the bezel. (12) 1970 GTX door wood: Be sure of red-white-blue emblem orientation of LEFT and RIGHT DOORS. The emblem goes toward rear of each door. Door bezels themselves are interchangeable left and right until the emblems are painted. The emblems fit onto the bezels only one way. The left side emblem is red at the rear. The right side emblem is red at the front. To paint emblems use these paints: Red = Rust-Oleum Safety Red #7564; Blue = Plasti Kote Rust-Oleum Sail Blue #7724. Each color must be thoroughly dry before the masking tape is used for the next segment. Paint that is not completely dry will be ruined if masking tape touches it. Do not remove the emblems from the bezels unless the bezels need to be re-anodized and/or emblems need to be re-chromed. The wood is available with a cutout so the emblem need not be removed. If peening is removed from the rear of the emblem, new studs must be welded on. Aftermarket GTX door bezel attachment clips are available from us. If the car has a left remote mirror, wood grain supplied to you will have extra material outboard the knob hole in the plate. Apply wood grain as normally in step #9. Let it dry thoroughly, use a hair dryer on low setting or a heat gun. Alternately use heat and fingers to stretch the wood into the hole. Make sure it tightly contacts all of the curves. Do not overheat the wood. When firmly stuck to the hole curves, firmly rub wood on the flat part of the plate around the hole. Use an X-acto knife with a short, sharp blade to trim the outer edges of the wood. (13) This complete service is available from Performance Car Graphics for Challenger and GTX door wood bezels.
11. __________________________________________________________
QUESTION: What is the correct paint sheen for the following parts: power steering pump, alternator brackets, master cylinder back-up plate, fan blades. Also I need to know the correct finish for the front and rear bumper supports. It appears that the shorter support on the front had the body color painted on a portion of the support but the longer piece does not appear to have been painted.
ANSWER: All the black on these parts is applied over bare metal -- no primer at all was used. Your new paint must be heat and grease resistant to have any durability. The sheen is simply neither flat nor fully gloss. Your body shop supplier can mix up a really good, durable paint like this. Of course you will want to ask about what primer to use for these parts. Or maybe there is a locally sold black that can be used over bare metal. Remember that any black from a spray can is likely to be very inferior to body shop supply custom paint. Bumpers and brackets would never be body color unless they had to be installed before a colored body part was installed over or around them. The alternator brackets were dipped in black. That means there will likely be paint runs. In general, anything that didn't make a difference in function, if it had paint runs, it was dipped. Sue George talked to retired workers from the St Louis (Fenton) assembly plant and they told her that any brackets that were painted were done so in what was called a "Flow Coat". That was where the brackets were hung from a rack in a small booth, an overhead valve was opened and a very large quantity of paint was allowed to flow over the part. That is why the original paint on engine brackets seems to be so heavy.
12. _____________________________________________________________
QUESTION: I'm trying to find out what color the dash panels are supposed to be in my car. It has a tan and black interior. I'm guessing the radio bezel is black like the gauge bezel, but what color is the passenger side trim above the glove box? Is it black like the rest of the dash bezels or is it tan like the dash pad? Is the top edge of this bezel supposed to be chrome also? Mine are all black painted right now and I would like to return them to the OE correct color.
ANSWER: The instrument panel frame is the metal housing that of course everything fits into. To restore that it's got to come out and the windshield has to come out. Then you sand blast and prime it. To match the color, take the ashtray (if you have the original one). Take it to an auto body supply shop where they can mix up the matching no-gloss paint that matches the dash frame color. You may also want to texture the paint like the original was because it was not just no-gloss. To do that, after you primer the frame, you spray on black organisol textured paint and then you spray on your tan over that. As for the plastic dash bezels on the Rallye dash, they are originally chrome and black. They completely chromed each bezel and then masked it off so that all the edges stayed chrome and the grainy texture is painted or dyed a black satin. Bezels on a Rallye dash are not interior colored. They are always black. If you want to paint other parts of your interior brown, you will notice, if you look carefully, that there are actually several different browns used on A-pillar moldings, windshield upper trim metal, side window upper trim, so that things looked different.
13. _______________________________________________________________
QUESTION: Regarding the stripes for my freshly restored car, NOS is NOS. No repro, however meticulously it is designed and made, will indeed be the same as an NOS piece. But, should I pay an excessive amount for NOS stripes for my car, after having it totally restored? Some of that 30-plus-year-old stuff has been rolled up in the box for years and years. Is the older vinyl material prone to premature cracking, lifting, etc.? Stripes have an adhesive backing. Unless I had a real mega-buck car, I think I'd prefer to apply the repros that at least utilize "new" materials and adhesive.
ANSWER: NOS stripes versus reproduction stripes, the first thing to consider is what material the original stripe was made out of. If it is gloss white, non-reflective, most of those stripes or letterings will show significant yellowing, especially if they were in sunlight or a relatively high heat area. So, gloss white decals are suspect. If the NOS stripes are made out of reflective material, i.e. "Scotchlite", those stripes are very likely to be cracked in many places due to the brittleness and thickness of reflective material. So, reflective stripes and lettering are very, very likely to be suspect. Any other non-reflective colors, including black, and especially textured or matte black, should be fine to use with one provision. That is, if the backing paper covering the adhesive of the stripe has pulled away and exposed the adhesive, very likely box particles and/or dust particles are now stuck to the adhesive of the stripe. This can quite easily be remedied however, by very gently brushing the particles off with a slightly moistened toothbrush using spray window cleaner. Do not, under any condition, brush hard enough to remove the adhesive itself or the stripe is ruined forever. One note about the textured/matte black stripes. If you've ever seen a car with ORIGINAL matte black stripes, you will see that they have a texture to them. They are not just matte black. That was a 3M material called DiNoc which is no longer made in that grade and is not available from anyone else either. So, in effect, ALL reproduction matte black stripes are wrong because of this.
14. ____________________________________________________
QUESTION: I own a 1970 AAR Cuda that was restored ten years go. The paint is a base coat/clear coat Vitamin C orange. A couple of the tape stripe sections have "spider web" cracks in the tape. My thought is to purchase a tape stripe kit and replace either the entire stripe or just the bad sections. Do you know of anyone who has removed their AAR stripes without repainting the car? Is it a bad idea to think of trying to replace the stripe without repainting? What method works best for removing the existing stripe? If you were me, would you replace the whole thing or just the bad sections? Do you have any advise to give me?
ANSWER: Is the clear coat over or under the stripes? I will assume it's under them for the following answers. The reason you should leave your stripes alone is that you will never get the new stripes on exactly where the old, cracked ones are now. This is almost surely to be the case, because the vinyl shrinks a tiny bit as soon as it's cut. The strobes on the car have also shrunk, in all directions, in the last ten years. If you could put a new strobe stripe on that was a tiny bit larger than the old one, no problem. But think of that un-faded orange paint under each strobe. If it isn't all covered by a new strobe, it will really stand out. I recommend getting acrylic enamel paint to touch up the cracks. If we made the stripes that were installed on your car, you can use Dutch Boy acrylic enamel flat black #3727, the trade name is "Fresh Look". It is available at K-Mart. If someone else made the stripes, this might not match.
15._______________________________________________________
QUESTION: Below is a photo I took of what happens when you pull the door VIN decal off the door jamb. I didn't realize it would say "Void".

ANSWER: Yes, the original door VIN decal will "void out" when pulled off. So will all emissions decals used on cars built after 3/10/70. This was a federal regulation designed to prevent motor vehicle fraud, in the case of the door VIN decal. The emissions decal had the "void out" so that the car couldn't be given an emissions decal with more lenient emissions specifications; i.e.: less air quality from the tail pipe. It would be possible, but very expensive, to reproduce the "void out" feature on decals. It is done by using different inks in the printing of the decals.
*PERFORMANCE CAR GRAPHICS, 723 Shannon Street, Tallahassee, FL 32305; phone (850) 878-1450; we have a complete line of restoration and detailing decals and we restore dash bezels, gauge clusters, switches, etc.
| MAIN PAGE | TABLE OF CONTENTS |